DICOM Basics using Java - Query and Retrieve Operations (C-FIND)
This article is part of my series of articles on the DICOM standard that I am currently working on (a number of them have already been completed). If you are totally new to DICOM, please have a quick look at my earlier article titled “Introduction to the DICOM Standard” for a quick introduction to the standard. It may also be useful to look at my other tutorials that have been completed so far to get up to speed on a number of topics including DICOM Encoding, SOPs and IODs. Before you dive into this article, please have a look at my previous DICOM networking-related tutorials on DICOM Verification and on DICOM Associations as a basic understanding of those topics is required to understand the material that is covered here. This tutorial also assumes that you know the basics of Java or any equivalent object-oriented language such as C# or C++. A basic understanding of networking will also be useful to have but is not mandatory.
Introduction
In this tutorial, we are going to begin our exploration around the aspects of DICOM networking that deal with search and retrieval of artifacts such as images and structured reports that are encoded in DICOM format. In this article, we are going to explore how to build a DICOM client (a 'C-FIND SCU' in DICOM terminology) that can query a remote peer (called a 'C-FIND SCP') for information one may be interested in. In the next few articles, I will gradually build on the foundation laid in this article and show you how to retrieve these artifacts for review locally (using 'C-MOVE SCU' and 'C-GET-SCU' DICOM operations). These operations are called Composite Services in DICOM (see my tutorial on DICOM Associations) for more information).
The PixelMed Java DICOM Toolkit - Quick Overview
For the purposes of illustrating many aspects of DICOM that I plan to cover in this tutorial series, I will be using a freely available and powerful DICOM toolkit called PixelMed Java DICOM Toolkit. This is a completely stand-alone DICOM toolkit that provides functionality for DICOM file and directory processing, image viewing as well as DICOM networking-related operations. This toolkit is completely free for both commercial or non-profit use. It is well documented and also has a small discussion forum and mailing list for users. The list of features contained within this toolkit is quite comprehensive. Please keep in mind that the use of this toolkit in my tutorial does not in anyway imply my official endorsement of it for implementing a production application. Every situation is unique, and only you are ultimately in the best position to decide that. This article is also not meant to be a tutorial on this toolkit, and my focus here is simply to tie DICOM theory to what a practical (although simple) implementation might look like. So, if your goal is to learn how to use the PixelMed library, I would encourage you to visit its website or check out the discussion forum or StackOverflow discussion pages for any assistance.
“The highest education is that which does not merely give us information but makes our life in harmony with all existence.” ~ Rabindranath Tagore
- Download and install the Eclipse Java IDE from here (or use any other IDE you prefer)
- Download the PixelMed toolkit library from here
- Ensure that the PixelMed.jar library is included in your Java project’s class path (some examples may require additonal runtime dependencies such as JAI Image IO Tools that can be found on PixelMed software download. Look for a tar compressed file called pixelmedjavadicom_dependencyrelease.YYYYMMDD.tar.bz2 or something similar)
- You can find the source code and images used in this tutorial on GitHub
- You can download more DICOM images from this site if you want as well
PACS Server Requirement
In addition to the tools described above, you will also need a DICOM server to execute some of the operations described in this tutorial. If you don't have access to one, you have one of two options. First option is to use Dr. Dave Harvey's free online PACS server provided here. Dr. Dave Harvey is a radiologist by background who runs this software company which provides medical imaging-related technology consulting services for clients as well toolkits for developers in the DICOM space. Although I have never used his toolkit, I have reached out to him for help on DICOM matters in the past, and he was kind enough to point me to some very useful material to read or look at regarding DICOM. So, check out his toolkit if you are looking for a commercial solution for your DICOM requirement that is compatible with the Microsoft platform. Another option is to download one of the many open source PACS servers available on the Internet. Orthanc Server is one such tool. Please see my article on getting started with Orthanc Server for more information.
Querying DICOM Data using C-FIND
If you recall my tutorial on DICOM associations, you will recall that before any two DICOM devices can exchange service requests and results between each other, an association first needs to be established. During the association establishment/negotiation, several activities happen. The two devices first check to see if they are accesible and can actually 'speak' DICOM (done through “DICOM ping” which is more formally known as “C-Echo” which we saw in an earlier tutorial). They also check to see if they are allowed to communicate with other from a DICOM security standpoint. This is done by checking whether the DICOM AE configurations have been set up on both sides. They then check to see if they support the DICOM operation that is desired often referred to as the "abstract syntax". Then, as a last step, they must check to see if they can agree on a "transfer syntax" for the information being exchanged (such as the VR encoding, compression and the byte ordering to be used). All these steps have to be completed before they proceed to performing the actual operations that are desired.
During the operational execution phase, the two DICOM peers exchange something called DICOM Message Service Elements (DIMSEs) with one another. These objects help indicate the actual operation that is required to be peformed, and they are accompanied by additional data referred to as Information Object Definitions (IODs) such as textual information or images that these operations are performed on. Together, these service elements and information objects they act on combine to form what are referred to in DICOM as Service Object Pairs (SOPs). The type of DIMSEs exchanged vary according to the type of operation being performed. For DICOM query operations, a C-FIND-RQ message is passed from the querying device (Device A) to the C-Find SCP (Device B) as shown in the illustration below. The C-FIND-RQ request message is accompanied by an IOD that consists of both the search criteria and also the attributes of data that need to be returned if matches are found.
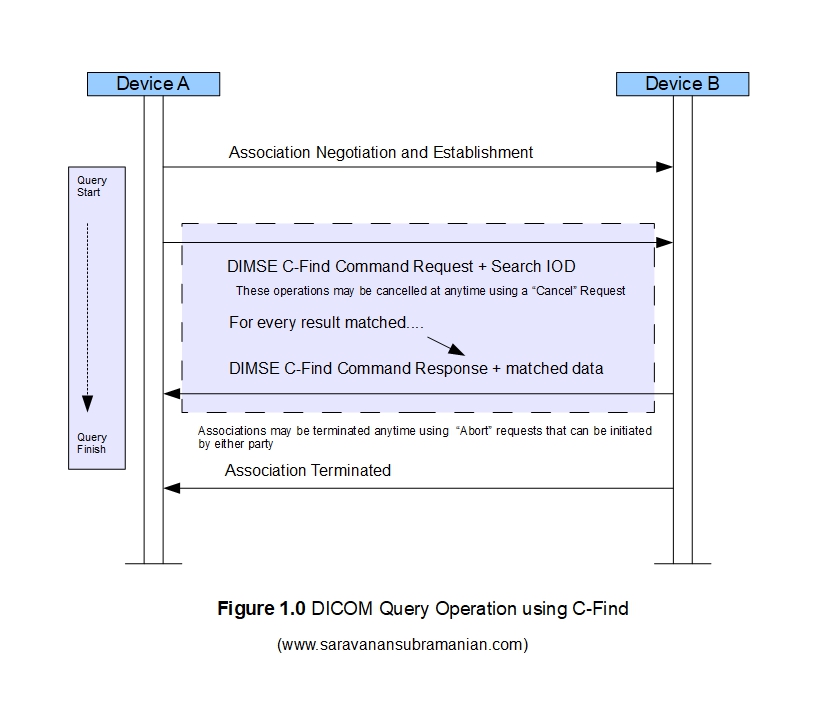
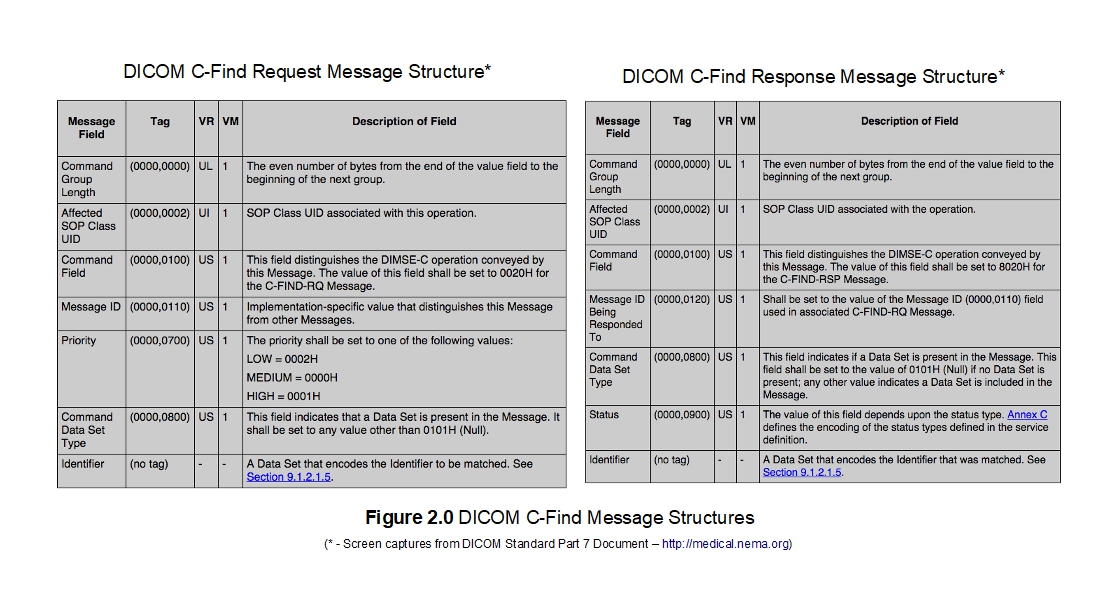
The structure of the C-FIND-RQ message request and message response objects is shown below. The tables shown are screen captures from the DICOM standard part 7 document that covers message exchange fundamentals. The queried SCP returns a 'C-FIND-RSP' response message for each entity matching the identifier specified in the request. Please note that the responses themselves are returned as DIMSE-IOD pairs with the DIMSE object communicating the status of the resposne operation (such as 'pending' when they are more results to follow in the sequence and 'successful' when all data has all been transmitted). The remote party may also transmit other DIMSE command responses for situations such as when there are no matching results or if other errors occur during the search operation. The client may also initiate a cancel operation anytime (using a 'C-CANCEL-FIND-RQ' command) while the search operation is in progress at which time the C-FIND-SCP will then cancel its search operation and return a DIMSE command with a status of 'cancelled'. Please see the official DICOM documentation for more details as the specification is huge and I can only provide an overview in this article.
For all query and retrieval services (also called 'Composite Services') in DICOM, data is looked up using something known as a "query level" which can be 'Patient Root', 'Study Root' or 'Patient/Study Only'. Of these, the 'Study Root' is the most popular method used for query operations. The 'Patient/Study Only' level was retired sometime ago but you may find some old DICOM software that may still support it. Along with a query level, a matching set of filters that are pertinent to the chosen query level are transmitted. The remote peer that receives the query request uses these filters essentially like a SQL search wildcard expression matching it to the relevant DICOM files that it may contain. Please note that official DICOM does not permit relational database type queries. However, some vendors choose to implement additional capabilities that are "SQL-like" into their products that operate on top of the core DICOM query features to make them behave very similar to any SQL tools that end users may already be familiar with. The DICOM standard itself specifies many kinds of search filtering through six kinds of matchers. Please see official DICOM documentation on search attributes and matching for more information. Something I should also mention here is that the C-FIND operation is used in both the DICOM Modality Worklist operation as well as the DICOM General Purpose Worklist operation (even if there are some differences in the information model for the data that is exchanged during these operations). I plan to cover both these operations in more detail a separate tutorial in the near future.
“Our life is composed greatly from dreams, from the unconscious, and they must be brought into connection with action. They must be woven together” ~ Anais Nin
Example of C-FIND operation
Let us have quick look at some code now. As mentioned earlier, the C-FIND operation uses a hierarchial data model during searches. The "query levels" specified in DICOM are 'Patient Root', 'Study Root' and 'Patient/Study Only'. However, it is also important to be aware of information mode hierarchy as well (from top to bottom) is as follows: "PATIENT -> STUDY -> SERIES -> IMAGE/INSTANCE". Knowing this hierarchy is important to perform searches in DICOM systems. For instance, one needs to specify the attributes for the patient when searching for a study (when using 'Study Root' query level). These are referred to as "Matching Keys" in DICOM. In addition, you also need to explicitly specify the attributes of data that you want returned when a match occurs (referred to as "Return Keys"). There is lot more to search, but let us take a look at a quick example using the PixelMed DICOM toolkit to perform a C-Find operation. I am going to connect to the public DICOM server made available by MedicalConnections information on which is provided here. Dr. Dave Harvey is a radiologist by background who runs this software company which provides medical imaging-related technology consulting services for clients as well toolkits for developers in the DICOM space. Although I have never used his toolkit, I have reached out to him for help on DICOM matters in the past, and he was kind enough to point me to some very useful material to read or look at regarding DICOM. So, check out his toolkit if you are looking for a commercial solution for your DICOM requirement that is compatible with the Microsoft platform.
    package com.saravanansubramanian.dicom.pixelmedtutorial;

    import com.pixelmed.dicom.AttributeList;
    import com.pixelmed.dicom.SOPClass;
    import com.pixelmed.dicom.SpecificCharacterSet;
    import com.pixelmed.dicom.TagFromName;
    import com.pixelmed.network.FindSOPClassSCU;
    import com.pixelmed.network.IdentifierHandler;

    public class DicomCFindFunctionalityDemo {

        public static void main(String arg[]) {

            try {
                // use the default character set for VR encoding - override this as necessary
                SpecificCharacterSet specificCharacterSet = new SpecificCharacterSet((String[])null);
                AttributeList identifier = new AttributeList();

                //build the attributes that you would like to retrieve as well as passing in any search criteria
                identifier.putNewAttribute(TagFromName.QueryRetrieveLevel).addValue("STUDY"); //specific query root
                identifier.putNewAttribute(TagFromName.PatientName,specificCharacterSet).addValue("Bowen*");
                identifier.putNewAttribute(TagFromName.PatientID,specificCharacterSet);
                identifier.putNewAttribute(TagFromName.PatientBirthDate);
                identifier.putNewAttribute(TagFromName.PatientSex);
                identifier.putNewAttribute(TagFromName.StudyInstanceUID);
                identifier.putNewAttribute(TagFromName.SOPInstanceUID);
                identifier.putNewAttribute(TagFromName.StudyDescription);
                identifier.putNewAttribute(TagFromName.StudyDate);

                //retrieve all studies belonging to patient with name 'Bowen'
                new FindSOPClassSCU("www.dicomserver.co.uk",
                        104,
                        "MEDCONNEC",
                        "OURCLIENT",
                        SOPClass.StudyRootQueryRetrieveInformationModelFind,identifier,
                        new IdentifierHandler());

            }
            catch (Exception e) {
                e.printStackTrace(System.err); // in real life, do something about this exception
                System.exit(0);
            }
        }

    }
“The greatest use of a life is to spend it for something that will outlast it” ~ William James
Results of running the code example is shown below. All studies for the patient with the name "Bowen" are returned with attributes that we specified. Using these results, one can then further narrow down on a specific study and the series of images associated with it if you needed to (I will let you explore this on your own).
IdentifierHandler.doSomethingWithIdentifier():
(0x0008,0x0005) SpecificCharacterSet VR=<CS> VL=<0x0> <>
(0x0008,0x0020) StudyDate VR=<DA> VL=<0x0> <>
(0x0008,0x0052) QueryRetrieveLevel VR=<CS> VL=<0x6> <STUDY >
(0x0008,0x0054) RetrieveAETitle VR=<AE> VL=<0xa> <MEDCONNEC >
(0x0008,0x1030) StudyDescription VR=<LO> VL=<0x10> <CT Left Shoulder>
(0x0010,0x0010) PatientName VR=<PN> VL=<0xe> <Bowen^William >
(0x0010,0x0020) PatientID VR=<LO> VL=<0x6> <PAT004>
(0x0010,0x0030) PatientBirthDate VR=<DA> VL=<0x0> <>
(0x0010,0x0040) PatientSex VR=<CS> VL=<0x0> <>
(0x0020,0x000d) StudyInstanceUID VR=<UI> VL=<0x1a> <1.2.826.0.1.3680043.11.105>
IdentifierHandler.doSomethingWithIdentifier():
(0x0008,0x0005) SpecificCharacterSet VR=<CS> VL=<0x0> <>
(0x0008,0x0020) StudyDate VR=<DA> VL=<0x0> <>
(0x0008,0x0052) QueryRetrieveLevel VR=<CS> VL=<0x6> <STUDY >
(0x0008,0x0054) RetrieveAETitle VR=<AE> VL=<0xa> <MEDCONNEC >
(0x0008,0x1030) StudyDescription VR=<LO> VL=<0x10> <CT Left Shoulder>
(0x0010,0x0010) PatientName VR=<PN> VL=<0x12> <Bowen^William^^Dr >
(0x0010,0x0020) PatientID VR=<LO> VL=<0x6> <PAT004>
(0x0010,0x0030) PatientBirthDate VR=<DA> VL=<0x0> <>
(0x0010,0x0040) PatientSex VR=<CS> VL=<0x0> <>
(0x0020,0x000d) StudyInstanceUID VR=<UI> VL=<0x1a> <1.2.826.0.1.3680043.11.105>
IdentifierHandler.doSomethingWithIdentifier():
(0x0008,0x0005) SpecificCharacterSet VR=<CS> VL=<0xa> <ISO_IR 100>
(0x0008,0x0020) StudyDate VR=<DA> VL=<0x8> <20180306>
(0x0008,0x0052) QueryRetrieveLevel VR=<CS> VL=<0x6> <STUDY >
(0x0008,0x0054) RetrieveAETitle VR=<AE> VL=<0xa> <MEDCONNEC >
(0x0008,0x1030) StudyDescription VR=<LO> VL=<0x0> <>
(0x0010,0x0010) PatientName VR=<PN> VL=<0x12> <Bowen^William^^Dr >
(0x0010,0x0020) PatientID VR=<LO> VL=<0x6> <PAT004>
(0x0010,0x0030) PatientBirthDate VR=<DA> VL=<0x0> <>
(0x0010,0x0040) PatientSex VR=<CS> VL=<0x0> <>
(0x0020,0x000d) StudyInstanceUID VR=<UI> VL=<0x1a> <1.2.826.0.1.3680043.11.106>
IdentifierHandler.doSomethingWithIdentifier():
(0x0008,0x0005) SpecificCharacterSet VR=<CS> VL=<0xa> <ISO_IR 192>
(0x0008,0x0020) StudyDate VR=<DA> VL=<0x8> <20180510>
(0x0008,0x0052) QueryRetrieveLevel VR=<CS> VL=<0x6> <STUDY >
(0x0008,0x0054) RetrieveAETitle VR=<AE> VL=<0xa> <MEDCONNEC >
(0x0008,0x1030) StudyDescription VR=<LO> VL=<0x0> <>
(0x0010,0x0010) PatientName VR=<PN> VL=<0xe> <Bowen^William >
(0x0010,0x0020) PatientID VR=<LO> VL=<0x6> <PAT004>
(0x0010,0x0030) PatientBirthDate VR=<DA> VL=<0x0> <>
(0x0010,0x0040) PatientSex VR=<CS> VL=<0x0> <>
(0x0020,0x000d) StudyInstanceUID VR=<UI> VL=<0x1a> <1.2.826.0.1.3680043.11.104>
Example of Overriding Identifier Handler Behavior with PixelMed
If you want to do more with the matched results, PixelMed also allows you to override the IdentifierHandler class to perform any additional processing that may be required with the matched search results. Here I have implemented a custom handler called OurCustomFindIdentifierHandler and basically show you how to extract the StudyInstanceUID tag value from the matched results. Feel free to explore this further on your own.
    package com.saravanansubramanian.dicom.pixelmedtutorial;

    import com.pixelmed.dicom.AttributeList;
    import com.pixelmed.dicom.DicomException;
    import com.pixelmed.dicom.SOPClass;
    import com.pixelmed.dicom.SpecificCharacterSet;
    import com.pixelmed.dicom.TagFromName;
    import com.pixelmed.network.FindSOPClassSCU;
    import com.pixelmed.network.IdentifierHandler;

    public class DicomCFindFunctionalityWithCustomIdentifierHandlerDemo {

        public static void main(String arg[]) {

            try {
                // use the default character set for VR encoding - override this as necessary
                SpecificCharacterSet specificCharacterSet = new SpecificCharacterSet((String[])null);
                AttributeList identifier = new AttributeList();

                //build the attributes that you would like to retrieve as well as passing in any search criteria
                identifier.putNewAttribute(TagFromName.QueryRetrieveLevel).addValue("STUDY"); //specific query root
                identifier.putNewAttribute(TagFromName.PatientName,specificCharacterSet).addValue("Bowen*");
                identifier.putNewAttribute(TagFromName.PatientID,specificCharacterSet);
                identifier.putNewAttribute(TagFromName.PatientBirthDate);
                identifier.putNewAttribute(TagFromName.PatientSex);
                identifier.putNewAttribute(TagFromName.StudyInstanceUID);
                identifier.putNewAttribute(TagFromName.SOPInstanceUID);
                identifier.putNewAttribute(TagFromName.StudyDescription);
                identifier.putNewAttribute(TagFromName.StudyDate);

                //retrieve all studies belonging to patient with name 'Bowen'
                new FindSOPClassSCU("www.dicomserver.co.uk",
                        104,
                        "MEDCONNEC",
                        "OURCLIENT",
                        SOPClass.StudyRootQueryRetrieveInformationModelFind,identifier,
                        new OurCustomFindIdentifierHandler());

            }
            catch (Exception e) {
                e.printStackTrace(System.err); // in real life, do something about this exception
                System.exit(0);
            }
        }

    }

    class OurCustomFindIdentifierHandler extends IdentifierHandler {

        //add additional constructors here as necessary to pass more information handling

        @Override
        public void doSomethingWithIdentifier(AttributeList attributeListForFindResult) throws DicomException {
            System.out.println("Matched result:" + attributeListForFindResult);

            String studyInstanceUID = attributeListForFindResult.get(TagFromName.StudyInstanceUID).getSingleStringValueOrEmptyString();
            System.out.println("studyInstanceUID:" + studyInstanceUID);

            //do other things you need to do with the matched results
        }

    }
Testing Tools for DICOM Query Operations
When you need to troubleshoot query operations in DICOM, it will helpful to use one of the many useful DICOM testing tools out there. The one that I have used in the past and have liked is DCMTK. The toolkit comes with many standalone testing utilities that help you test various aspects related to DICOM processing through a command line interface. The findscu command is the one that I will use here to retrieve matching study results matched for a specified patient from Dr. Dave Harvey's free online DICOM test server provided here. This server is listening to requests on port 104 in the example shown below. Here, I am specifying the query root as "STUDY", the patient name I am searching as "SAMUAL", and am also specifying the attributes of data that I would like to retrieve with the matched results (StudyInstanceUID and the StudyDate attributes here). Note:Only a portion of the console output generated when running this command is shown below for reference.
C:\SaravananDicomTestingTools\dcmtk-3.6.5-win64-dynamic\bin>findscu -v -S -k 0008,0052="STUDY" -k PatientName="SAMUAL*" -k StudyInstanceUID="" -k StudyDate="" -aet OurFindScu "www.dicomserver.co.uk" 104 -aec MEDCONNECTIONS

I: Requesting Association
I: Association Accepted (Max Send PDV: 65524)
I: Sending Find Request (MsgID 1)
I: Request Identifiers:
I:
I: # Dicom-Data-Set
I: # Used TransferSyntax: Little Endian Explicit
I: (0008,0020) DA (no value available)                     #   0, 0 StudyDate
I: (0008,0052) CS [STUDY]                                  #   6, 1 QueryRetrieveLevel
I: (0010,0010) PN [SAMUAL*]                                #   8, 1 PatientName
I: (0020,000d) UI (no value available)                     #   0, 0 StudyInstanceUID
I:
I: ---------------------------
I: Find Response: 1 (Pending)
I:
I: # Dicom-Data-Set
I: # Used TransferSyntax: Little Endian Explicit
I: (0008,0005) CS (no value available)                     #   0, 0 SpecificCharacterSet
I: (0008,0020) DA [20200318]                               #   8, 1 StudyDate
I: (0008,0052) CS [STUDY ]                                 #   6, 1 QueryRetrieveLevel
I: (0008,0054) AE [MEDCONNECTIONS]                         #  14, 1 RetrieveAETitle
I: (0010,0010) PN [Samual^Davies ]                         #  14, 1 PatientName
I: (0020,000d) UI [1.3.6.1.4.1.30071.8.247186163303517.6378443245758100] #  52, 1 StudyInstanceUID
I:
I: ---------------------------
I: Find Response: 2 (Pending)
I:
I: # Dicom-Data-Set
I: # Used TransferSyntax: Little Endian Explicit
I: (0008,0005) CS (no value available)                     #   0, 0 SpecificCharacterSet
I: (0008,0020) DA [20200318]                               #   8, 1 StudyDate
I: (0008,0052) CS [STUDY ]                                 #   6, 1 QueryRetrieveLevel
I: (0008,0054) AE [MEDCONNECTIONS]                         #  14, 1 RetrieveAETitle
I: (0010,0010) PN [Samual^Davies ]                         #  14, 1 PatientName
I: (0020,000d) UI [1.3.6.1.4.1.30071.8.247186163303517.6378443765491270] #  52, 1 StudyInstanceUID
I:
I: ---------------------------
I: Find Response: 3 (Pending)
I:
I: # Dicom-Data-Set
I: # Used TransferSyntax: Little Endian Explicit
I: (0008,0005) CS (no value available)                     #   0, 0 SpecificCharacterSet
I: (0008,0020) DA [20200318]                               #   8, 1 StudyDate
I: (0008,0052) CS [STUDY ]                                 #   6, 1 QueryRetrieveLevel
I: (0008,0054) AE [MEDCONNECTIONS]                         #  14, 1 RetrieveAETitle
I: (0010,0010) PN [Samual^Davies ]                         #  14, 1 PatientName
I: (0020,000d) UI [1.3.6.1.4.1.30071.8.247186163303517.6378449008913780] #  52, 1 StudyInstanceUID
I:
I: ---------------------------
I: Find Response: 4 (Pending)
I:
I: # Dicom-Data-Set
I: # Used TransferSyntax: Little Endian Explicit
I: (0008,0005) CS (no value available)                     #   0, 0 SpecificCharacterSet
I: (0008,0020) DA [20200318]                               #   8, 1 StudyDate
I: (0008,0052) CS [STUDY ]                                 #   6, 1 QueryRetrieveLevel
I: (0008,0054) AE [MEDCONNECTIONS]                         #  14, 1 RetrieveAETitle
I: (0010,0010) PN [Samual^Davies ]                         #  14, 1 PatientName
I: (0020,000d) UI [1.3.6.1.4.1.30071.8.247186163303517.6378449024588160] #  52, 1 StudyInstanceUID
I:
I: ---------------------------
I: Find Response: 5 (Pending)
I:
I: # Dicom-Data-Set
I: # Used TransferSyntax: Little Endian Explicit
I: (0008,0005) CS (no value available)                     #   0, 0 SpecificCharacterSet
I: (0008,0020) DA [20200318]                               #   8, 1 StudyDate
I: (0008,0052) CS [STUDY ]                                 #   6, 1 QueryRetrieveLevel
I: (0008,0054) AE [MEDCONNECTIONS]                         #  14, 1 RetrieveAETitle
I: (0010,0010) PN [Samual^Davies ]                         #  14, 1 PatientName
I: (0020,000d) UI [1.3.6.1.4.1.30071.8.247186163303517.6378449030292020] #  52, 1 StudyInstanceUID
I:
I: ---------------------------
I: Find Response: 6 (Pending)
I:
I: # Dicom-Data-Set
I: # Used TransferSyntax: Little Endian Explicit
I: (0008,0005) CS (no value available)                     #   0, 0 SpecificCharacterSet
I: (0008,0020) DA [20200318]                               #   8, 1 StudyDate
I: (0008,0052) CS [STUDY ]                                 #   6, 1 QueryRetrieveLevel
I: (0008,0054) AE [MEDCONNECTIONS]                         #  14, 1 RetrieveAETitle
I: (0010,0010) PN [Samual^Davies ]                         #  14, 1 PatientName
I: (0020,000d) UI [1.3.6.1.4.1.30071.8.247186163303517.6378449082833540] #  52, 1 StudyInstanceUID
I:
I: ---------------------------
I: Find Response: 7 (Pending)
I:
I: # Dicom-Data-Set
I: # Used TransferSyntax: Little Endian Explicit
I: (0008,0005) CS (no value available)                     #   0, 0 SpecificCharacterSet
I: (0008,0020) DA [20200318]                               #   8, 1 StudyDate
I: (0008,0052) CS [STUDY ]                                 #   6, 1 QueryRetrieveLevel
I: (0008,0054) AE [MEDCONNECTIONS]                         #  14, 1 RetrieveAETitle
I: (0010,0010) PN [Samual^Davies ]                         #  14, 1 PatientName
I: (0020,000d) UI [1.3.6.1.4.1.30071.8.247186163303517.6378449085807630] #  52, 1 StudyInstanceUID
I:
I: Received Final Find Response (Success)
I: Releasing Association
I:
I: Received Final Find Response (Success)
I: Releasing Association
Conclusion
This concludes the article on how the C-FIND query operation work in DICOM. This enables the first step in the overall process in performing most information retrieval operations in DICOM. In the next tutorial in this series on the DICOM standard, I will cover how another composite operation called "C-MOVE" which helps instruct a remote DICOM server (a 'C-MOVE SCP') to transfer DICOM data back to the client or to a specified location. See you then!