DICOM Basics using Java - Extracting Image Data
Introduction
This is part of my series of articles on the DICOM standard. If you are totally new to DICOM, please have a quick look at my earlier article titled “Introduction to the DICOM Standard” for a quick introduction to the standard. As this tutorial requires some understanding of the structure of the DICOM file and the encoding process used for embedding content within it, please also have a look at my previous tutorials “DICOM Basics - Making Sense of the DICOM File” and “DICOM Basics using Java - Creating a DICOM File”. This tutorial also assumes that you know the basics of Java or any equivalent object-oriented language such as C# or C++.
When most people think of DICOM, they tend to think of MR or CT images displayed on large display monitors with radiologists in white coats hovered around them. There is a reason for this perception as image data has been a key (and successful) consideration for the past and continued evolution of the DICOM standard, and also explains its immense popularity in clinical settings around the world. Many aspects of image display such as image compression can be one of the most interesting, and at the same time one of the most challenging areas to understand for DICOM developers. Much like my previous tutorials, let us understand some more DICOM terminology around imaging as well as some important DICOM elements that store image-related data before we dive into some code examples.
The PixelMed Java DICOM Toolkit - Quick Overview
For the purposes of illustrating many aspects of DICOM that I plan to cover in this tutorial series, I will be using a freely available and powerful DICOM toolkit called PixelMed Java DICOM Toolkit. This is a completely stand-alone DICOM toolkit that provides functionality for DICOM file and directory processing, image viewing as well as DICOM networking-related operations. This toolkit is completely free for both commercial or non-profit use. It is well documented and also has a small discussion forum and mailing list for users. The list of features contained within this toolkit is quite comprehensive. Please keep in mind that the use of this toolkit in my tutorial does not in anyway imply my official endorsement of it for implementing a production application. Every situation is unique, and only you are ultimately in the best position to decide that. This article is also not meant to be a tutorial on this toolkit, and my focus here is simply to tie DICOM theory to what a practical (although simple) implementation might look like. So, if your goal is to learn how to use the PixelMed library, I would encourage you to visit its website or check out the discussion forum or StackOverflow discussion pages for any assistance.
Before We Get Started…
Much like my previous programming examples, I will use the most bare minimum code and approach to help illustrate the concepts that I cover in this tutorial. This means that the code I write here is best suited to simply show the concept that I am trying to explain and is not necessarily the most efficient code to deploy in real life and in your production application.
To get started, you will need to configure a few things on your machine including a Java development environment as well as the PixelMed toolkit before you can run the example if you want to try this out yourself.
- Download and install the Eclipse Java IDE from here (or use any other IDE you prefer)
- Download the PixelMed toolkit library from here
- Ensure that the PixelMed.jar library is included in your Java project’s class path (some examples may require additonal runtime dependencies such as JAI Image IO Tools that can be found on PixelMed software download. Look for a tar compressed file called pixelmedjavadicom_dependencyrelease.YYYYMMDD.tar.bz2 or something similar)
- You can find the source code and images used in this tutorial on GitHub
- You can download more DICOM images from this site if you want as well
Making Sense of Image Related Tags
In my earlier tutorial namely “DICOM Basics - Making Sense of the DICOM File”, I explained that all DICOM files are essentially serialized versions of DICOM objects (also known as IODs or Information Object Definitions). Data belonging to these IODs are stored in the form of elements (or tags) within the DICOM file. We output information relating to many of these tags such as patient id, patient name, study id, study number, series number, etc to the console in my earlier code examples. DICOM stores image-related data using tags in the same way by using the necessary VR types. The code example below shows how to retrieve the most important image related tags.
    package com.saravanansubramanian.dicom.pixelmedtutorial;
    import com.pixelmed.dicom.Attribute;
    import com.pixelmed.dicom.AttributeList;
    import com.pixelmed.dicom.AttributeTag;
    import com.pixelmed.dicom.OtherWordAttribute;
    import com.pixelmed.dicom.TagFromName;
    import com.pixelmed.display.SourceImage;

    public class DisplayImageTagsToConsole {

        private static AttributeList list = new AttributeList();
        public static void main(String[] args) {
            String dicomFile = "D:\\JavaProjects\\Sample Images\\MR-MONO2-16-head";

            try {
                list.read(dicomFile);
                System.out.println("Transfer Syntax:" + getTagInformation(TagFromName.TransferSyntaxUID));
                System.out.println("SOP Class:" + getTagInformation(TagFromName.SOPClassUID));
                System.out.println("Modality:" + getTagInformation(TagFromName.Modality));
                System.out.println("Samples Per Pixel:" + getTagInformation(TagFromName.SamplesPerPixel));
                System.out.println("Photo Int:" + getTagInformation(TagFromName.PhotometricInterpretation));
                System.out.println("Pixel Spacing:" + getTagInformation(TagFromName.PixelSpacing));
                System.out.println("Bits Allocated:" + getTagInformation(TagFromName.BitsAllocated));
                System.out.println("Bits Stored:" + getTagInformation(TagFromName.BitsStored));
                System.out.println("High Bit:" + getTagInformation(TagFromName.HighBit));

                SourceImage img = new com.pixelmed.display.SourceImage(list);
                System.out.println("Number of frames " + img.getNumberOfFrames());
                System.out.println("Width " + img.getWidth());//all frames will have same width
                System.out.println("Height " + img.getHeight());//all frames will have same height
                System.out.println("Is Grayscale? " + img.isGrayscale());
                System.out.println("Pixel Data present:" + (list.get(TagFromName.PixelData) != null));
                OtherWordAttribute pixelAttribute = (OtherWordAttribute)(list.get(TagFromName.PixelData));

                //get the 16 bit pixel data values
                short[] data = pixelAttribute.getShortValues();
            } catch (Exception e) {
                e.printStackTrace(); //in real life, do something about this exception
            }
        }

        private static String getTagInformation(AttributeTag attrTag) {
            return Attribute.getDelimitedStringValuesOrEmptyString(list, attrTag);
        }
    }
A small portion of the output from running the code above is shown below:
Transfer Syntax:1.2.840.10008.1.2
SOP Class:1.2.840.10008.5.1.4.1.1.4
Modality:MR
Samples Per Pixel:1
Photometric Interpretation:MONOCHROME2
Pixel Spacing:0.859375\0.859375
Bits Allocated:16
Bits Stored:16
High Bit:15
Number of frames 1
Width 256
Height 256
Is Grayscale? true
Pixel Data present:true
“It is not hard to learn more. What is hard is to unlearn when you discover yourself wrong.” ~ Martin H. Fischer
The console output above shows the values of the various tags commonly utilized during image operations. The transfer syntax value of 1.2.840.10008.1.2.4.90 indicates that this is JPEG 2000 Image Compression (Lossless Only) (you can see other transfer syntaxes here). The SOP Class value of 1.2.840.10008.5.1.4.1.1.2 indicates that it is of CT Image Storage type (you can see other SOP classes here). This image was generated by a CT modality (other modality types are listed here). Samples Per Pixel indicates the number of color channels utilized in encoding the pixel data, and a value of 1 indicates that it has only 1 channel (not color). Photometric Interpretation indicates what each color channel can hold and the value of MONOCHROME2 indicating that it is essentially a grayscale image (other values include RGB and YBR encoding).
DICOM uses the concept of Pixel Cells to store each pixel value. The size of the each of these cells is indicated by the Bits Allocated tag (0028,0100) which contains the value of 16 here (essentially 2 bytes). The Bits Stored tag (0028,0101) helps specify the total number of bits that have been allocated in each cell (has a value of 16 here as well) and can never be larger than the Bits Allocated value. The High Bit tag (0028,0102) specifies where the high order bit is to be placed when storing data in the pixel cells. This number uses a zero index based, and that explains why the value output to the console is 15 instead of 16 for this image file. The Number of Frames tag (0028,0008) displays how many frames of image data are stored within this DICOM file, and is 1 here indicating that there is only one frame. The Rows tag (0028,0010) and the Columns tag (0028,0011) help define the size of the image and are 512 pixels each. Please note that in a multi-frame DICOM file, all images are stored with the same number of rows and columns for pixels. The Pixel Spacing tag (0028,0030) allows us to do measurements in physical units such as millimeters and also allows for 3D reconstructions if necessary. In addition to these tags, there is also another tag called Planar Configuration (0028,0006) which is used in DICOM color images only, and specifies how the pixel data are arranged.
That covers all the major tags in the image data module. There are lot more tags, and it would take me an entire book to explain all of them. Knowing the tags I cover here should be more than sufficient to build a basic understanding of how image data is stored.
Image Compression
Besides raw bitmap type images (called the Native format in DICOM), the standard also supports the storage of compressed image data using something known as the DICOM Encapsulated Format. In this approach, the same data tags I described previously are encoded with the characteristics of the compressed data stream and stored within the DICOM file. Image compression algorithms supported in the standard include such as JPEG, JPEG2000, JPEG-LS, RLE and ZIP. The type of compression algorithm utilized to store the pixel data is indicated by the transfer syntaxes which we covered previously. These transfer syntaxes include JPEG Baseline, JPEG Baseline (Processes 2 & 4), JPEG-LS Lossless Image Compression, JPEG 2000 Image Compression (Lossless Only) and RLE Lossless. Each of these transfer syntaxes are identified by unique UIDs that we read about in my previous tutorial. By standardizing the image data storage using the tags I described in my code illustration above, the DICOM standard makes the task of dealing with most image data (whether native or otherwise) easier.
Image Compression is huge topic and I refer you to Part 5 (more specifically section 8) of the DICOM standard for more information on this area. When dealing with transfer syntaxes that utilize the encapsulated pixel format, you must choose the right image decoder and provide the pixel data to the decoder and extract the pixel data to a file. Many DICOM toolkits including the PixelMed library either have image decoders built-in or use additional third party image libraries to extract compressed data from the DICOM file. You can some of these utility classes that handle compressed image data in the com.pixelmed.convert and the com.pixelmed.display packages of the PixelMed library.
I want to add some comments here before we proceed to the next section. With all the image compression options available, you might wonder whether one needs to implement all these types in their custom DICOM application. The good news is that you don’t have to in most cases. If the users of your software are interested in accuracy of the image details, you might prefer a lossless compression, but if you are dealing with a tele-radiology project where images need to be transmitted over large distances and network bandwidth is a big consideration, then you may be forced to choose a lossy compression. Some tele-radiology applications even convert the DICOM images to non-DICOM lossy compressed images before transmission. Even then, make sure that the original lossless DICOM image is still archived somewhere safely for legal requirements if you need to refer to it. If you are dealing with a modern PACS system, you will be able to negotiate the type of image compression (or transfer syntax) you would like to deal with, and force the PACS system to transmit the images in the format you support during association establishment (I will be covering how to do this in a future tutorial). However, you may not have this luxury all the time. So, always understand the big picture of who your end users are and what systems you are likely going to be dealing with before you make that decision.
Extracting Image Data to File (Single Frame)
Enough talk. Let us look at some more code. I will now show you how to extract this image pixel data from DICOM files. The PixelMed library makes the task of extracting the image pixel data and writing to jpeg, tiff or png files very easy. The class that we need to use in the ConsumerFormatImageMaker class located in the com.pixelmed.display package, and the method convertFileToEightBitImage does the work for us. The code you need to use to covert to various image types is shown below. The extracted jpeg file that resulted from this operation is also shown below the code illustration.
    package com.saravanansubramanian.dicom.pixelmedtutorial;
    import com.pixelmed.display.ConsumerFormatImageMaker;

    public class ExportDicomImageDataToOtherImageFormats {

        public static void main(String[] args) {

            String dicomFile = "D:\\JavaProjects\\Sample Images\\MR-MONO2-16-head";
            String outputJpgFile = "D:\\JavaProjects\\Sample Images\\Outputs\\MR-MONO2-16-head.jpg";
            String outputPngFile = "D:\\JavaProjects\\Sample Images\\Outputs\\MR-MONO2-16-head.png";
            String outputTiffFile = "D:\\JavaProjects\\Sample Images\\Outputs\\MR-MONO2-16-head.tiff";

            try {
                ConsumerFormatImageMaker.convertFileToEightBitImage(dicomFile, outputJpgFile, "jpeg", 0);
                ConsumerFormatImageMaker.convertFileToEightBitImage(dicomFile, outputPngFile, "png", 0);
                ConsumerFormatImageMaker.convertFileToEightBitImage(dicomFile, outputTiffFile, "tiff", 0);
            } catch (Exception e) {
                e.printStackTrace(); //in real life, do something about this exception
            }
        }

    }
Extracting Image Data to Files (Multi-Frame)
When the convertFileToEightBitImage method is invoked on multi-frame DICOM files, the output file names will be postfixed with the frame number before the format extension. So, for a DICOM file containing two frames of image data for instance, specifying "output.jpg" for the output file name will result in two jpg files "output_001.jpg" and "output_002.jpg" created in the output directory. Code illustration is show below. There are a number of other overloads for the convertFileToEightBitImage method as well as other methods in the ConsumerFormatImageMaker class which provide access to the individual frames of a multi-frame DICOM file if we needed them. I will leave it to you to explore them.
    package com.saravanansubramanian.dicom.pixelmedtutorial;
    import com.pixelmed.display.ConsumerFormatImageMaker;

    public class ExportMultiFrameDicomImageDataToOtherImageFormats {

        public static void main(String[] args) {

            String dicomFile = "D:\\JavaProjects\\Sample Images\\XA-MONO2-8-12x-catheter";
            String outputJpgFile = "D:\\JavaProjects\\Sample Images\\Outputs\\XA-MONO2-8-12x-catheter.jpg";

            try {
                //Will result in 16 jpeg files created as the input DICOM file has 16 frames
                ConsumerFormatImageMaker.convertFileToEightBitImage(dicomFile, outputJpgFile, "jpeg", 0);
            } catch (Exception e) {
                e.printStackTrace(); //in real life, do something about this exception
            }
        }

    }
Window Width and Leveling in DICOM
Before I conclude this tutorial, I need to say something about some terminology that you will hear in the context of DICOM viewer applications which is Window Width and Leveling. This is a post-processing operation after the image has been generated, and involves manipulating the histogram of the image to zone in on aspects of the image that is of interest to us. We saw in my code illustration at the beginning of this tutorial that the standard DICOM supports up to 65,536 (16 bits) shades of gray for monochrome image display. This is incredibly powerful and enables the radiologist to see the smallest nuances in a radiological image. Compare this to other image formats such as GIF, BMP or JPEG and you will realize why they tend to be seldom used for diagnostic purposes.
When DICOM images are seen in clinical settings, they are often seen on special radiological monitors which provide support for the 65,536 shades of gray. This is not the case however when images are seen in cellphone, tablet or off-the-shelf monitor screens. These often only display anywhere from 256 to 4096 shades of gray (this is changing with better capabilities these days). This is where Window Width and Level comes in when dealing with most DICOM software. It enables us to transform the pixel value stored in a DICOM file to a value supported on the screen. Also, various body parts are often captured at different intensity levels (or shades) during scan procedures and the radiologist essentially wants to narrow down on those body parts such as lung, chest, head, etc at the exclusion of other pixel ranges. Window Width enable us to choose the lower and upper threshold of pixel range/intensity values that we are interested in. This, feature, in essence, enables you to navigate the entire 65,536 levels of pixel depth by using a much smaller range at a time. The Window Level (also known as "Window Center") enables us to control the luminous intensity within this selected range. Using this feature, pixel density differences can be magnified since the human eye is thought to only detect about 20-30 shades of grey in any image.
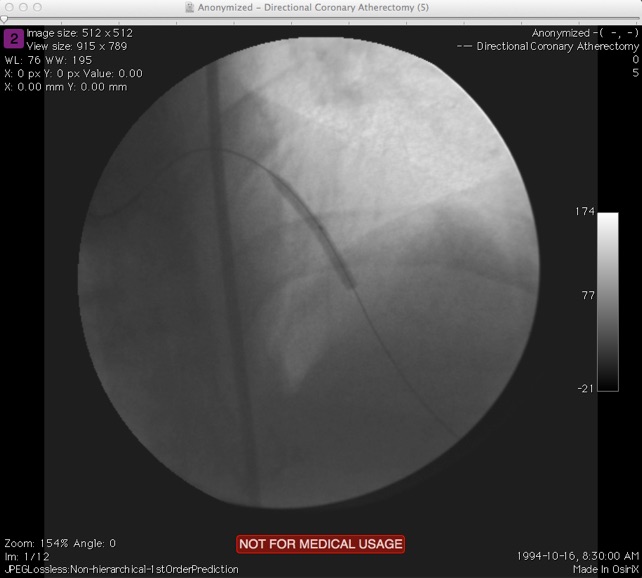
In most DICOM software, pressing the mouse button and dragging it left and right should allow you to control window width, and dragging it up or down should control the level. On other software, there might be two controls side by side which are marked W and L (always read your product documentation to be safe). See screen capture below from OsiriX software running on my machine at home showing the Window Width and Level functionality on a DICOM image.To sum up, a radiological workstation monitor would have permitted you to see all 65,536 shades of gray at once, but in a conventional monitor, or a cell phone for example, you will use W/L functions to navigate the entire range in small sized chunks at a time adjusting for the body part you want to zone in as well as adjusting for the viewing monitor’s capabilities and the user’s eye comfort at the same time. Most software will have presets for head, lung, etc to enable the radiologist to select these ranges quickly at the same time providing him/her with the ability to override these settings when necessary. Pretty cool, huh?
Conclusion
That concludes this tutorial dealing with a high level overview of image data in DICOM. This was a fun tutorial to write for me as it allowed me to brush up on a topic that I has long interested me. Again, there was only so much I could cover in this tutorial as this entire series of these tutorials in really meant to provide an accelerated introduction for programmers who are new to this interesting standard used in diagnostic medicine. If you are interested in reading further on the topics covered here, I recommend that you to check out David Clunie’s website (this man is an encyclopedia of knowledge on DICOM and is generous in his sharing of knowledge on this topic). Of course, you should also read the DICOM Standard available here. In the next tutorial in this series, I will show you how to implement code to display an image, scroll through multiple image frames if necessary as well as perform window level/width operations . If you have any questions or comments regarding this tutorial, please feel free to send me an email. Please note that I may not get back to you right away due to work and other commitments.
Footnote: The DICOM standard restricts the file names/identifiers contained within to 8 characters (either uppercase alphabetic characters and numbers only) to keep in conformity with legacy/historical requirements. It also states that no information must be inferred/extracted from these names. The file names usually don’t have a .dcm extension when they are stored as part of a media such as CD or DVD. I use longer names to keep these details from being a distraction right now, but I still want to mention what the standard states here so that no confusion arises as a result.