HL7 Programming using .NET - A Short Tutorial
Introduction
This is part of my HL7 article series. So far in this series, we have looked at a number of articles on HL7 programming using the Java platform. Let me now turn our attention to the .NET ecosystem and look at how we can build HL7 2.x applications using the C# programming language. Many years ago I had written a tutorial titled "HL7 Programming using Java" that attempted to provide a foundational understanding of HL7 2.x for Java programmers using a software programming approach, and it proved to be a popular article on my blog. I decided to do something similar for the .NET community as well since I have been doing a lot more .NET programming since then. Like Java, .NET also provides many useful abstractions in the form of classes and interfaces to make the task of network programming easy. However, this whole space can be a bit overwhelming for people who are new to this space since they are simply too many ways of achieving the same goal. So, I decided to keep things very simple, and keep to the absolute basics so it does not divert our attention from the primary goal of this article which is to understand the "nuts and bolts" of HL7 2.x standard from a software implementation perspective. I have used the same step by step approach that I followed in my previous article to make it easy to follow for .NET programmers who are totally new to both the HL7 2.x standard as well as with network programming, threads, asynchronosity, etc. Network programming especially does not feature very much in most modern business applications which mostly run on the web mostly using the HTTP/HTTPS protocols. However, knowing network programming is still relevant as it forms the backbone of nearly all digital communications in the world. Protocols such as TCP/IP, UDP, etc continue to be relevant today as they were a few decades ago as many modern technologies that we all use every day are all built to run on top of these foundations. So, I hope this article proves to be beneficial for people who are totally new to networking programming as well.
Before we get started on this tutorial, have a quick look at my earlier article titled “A Very Short Introduction to the HL7 2.x Standard”. Please note that this tutorial assumes you know C# or any equivalent object-oriented language such as Java. A basic understanding of network as well as thread programming will be useful but is not necessary.
A few things to note before we begin are the following:
- Although the HL7 standard itself does not recommend any specific protocol to use for message communication, most HL7 2.x systems communicate using the Minimum Lower Layer Protocol which is another layer of abstraction on top of the TCP/IP protocol. This is what I will be covering in this tutorial.
- Advanced topics such as robust error handling, error logging and notifications, message translation as well as data persistence are not covered in this tutorial. However, armed with the fundamentals, you should be able to approach these aspects further.
“Trees are poems that the earth writes upon the sky.” ~ Khalil Gibran
What is Minimum Lower Layer Protocol?
Minimum Lower Layer Protocol (often shortened to “MLLP”) is the most popular protocol used for transmitting HL7 messages using TCP/IP. Because TCP/IP transmits information as a continuous stream of bytes, a wrapping protocol is required for communications code to be able to recognize the start and the end of each message. MLLP is often used to address this requirement typically using non-printable characters to serve as wrapping characters around the core HL7 message information. These wrapping characters help envelope the HL7 message payload effectively as a "block" of data which is then transmitted to the receiving system. The receiving system then unwraps the message payload, parses the message content and then acknowledges the receipt of this message by returning a response message (known as "ACK" or a "NACK" message in HL7) in a similar way. In MLLP-based systems, the source system shall typically not send any new messages until the acknowledgement message of a previously transmitted message is received.
Something to keep in mind is that the MLLP Block that I described above is framed by the use of characters that have single-byte values. These characters have to agreed upon by the sites exchanging information since the data in the message content can potentially conflict with the byte values used for framing the MLLP block required to carry the message. Also, the use of multi-byte character encodings such as UTF-16 or UTF-32 is not ideal in these situations since this may result in byte values of the data which may equal the MLLP framing characters leading to MLLP enveloping-related errors. So, use of only single byte value encoding such as UTF-8, ISO-8859-x, etc is recommended. Please see official HL7 documentation for more on this area.
What are Sockets?
You can think of sockets as an abstraction of “terminals” of a connection between two machines transmitting information through either TCP or the UDP protocols. Most modern languages such as C#, Java and Ruby provide socket-programming support through a rich library of classes and/or interfaces. This reduces the burden of application programmers having to deal with lower layers of the OSI (Open Systems Interconnect) model of the ISO (International Standards Organization) standard. When using sockets, the programmer is working with the “Session” layer, and therefore shielded from having to deal with real-time data communication services provided by the lower layer of the OSI stack. C# provides excellent support for socket programming (through the System.Net package). We will be using various classes such as TcpClient and TcpListener available in the .NET framework which are specifically tailored for use with the TCP/IP protocol and enable socket-based communications. However, we won't be dealing with sockets directly as the TcpClient and TcpListener classes provide some additional abstraction for us from having to deal with it directly. But, I would still encourage you to explore the other classes in the .NET framework around network programming including the Socket class if you are intending to be build your own full-fledged TCP server as the features present in these low-level classes will prove very useful in many situations.
Tools you need
- .NET Framework 4.5 or higher
- A .NET IDE or Editor such as Visual Studio IDE or Visual Studio Code (even a text editor should suffice)
- A network troubleshooting tool such as WireShark or PacketSender would be extremely useful during troubleshooting of connections. I will use PacketSender for this tutorial to simulate a TCP client and TCP server as and when necessary
- Download HAPI Test Panel (a HL7 test utility) from here
- You can also find all the code demonstrated in this tutorial on GitHub here
Getting Started
We will take small steps so all the core elements are covered
-
Build a simple TCP/IP client capable of transmission and receipt of information.
-
Build a simple TCP/IP server capable of receiving and echo-ing of received information
-
Build support for the server to handle many concurrent connections from clients
-
Add MLLP and message acknowledgement features into the server
-
Write a small TCP/IP client that will transmit a dummy MLLP-wrapped HL7 message
-
Modify the server class to build MLLP-based parsing functionality
-
Modify the server class to build HL7 message acknowledgement functionality
-
Put it all together
Step 1 of 8 - Build a simple TCP/IP client capable of transmission and receipt of information
Here is a really simple TCP client that we will use for understanding how TCP/IP communications work at a very high level. We will use as well as modify this client progressively to develop and test our server application through various stages below.
using System;
using System.Net;
using System.Net.Sockets;
using System.Text;
namespace SimpleTcpEchoClient
{
public class Program
{
static void Main(string[] args)
{
TcpClient ourTcpClient = null;
NetworkStream networkStream = null;
try
{
//initiate a TCP client connection to local loopback address at port 1080
ourTcpClient = new TcpClient();
ourTcpClient.Connect(new IPEndPoint(IPAddress.Loopback, 1080));
Console.WriteLine("Connected to server....");
//get the IO stream on this connection to write to
networkStream = ourTcpClient.GetStream();
//use UTF-8 and either 8-bit encoding due to MLLP-related recommendations
var messageToTransmit = "Hello from Client";
var byteBuffer = Encoding.UTF8.GetBytes(messageToTransmit);
//send a message through this connection using the IO stream
networkStream.Write(byteBuffer, 0, byteBuffer.Length);
Console.WriteLine("Data was sent data to server successfully....");
var bytesReceivedFromServer = networkStream.Read(byteBuffer, 0, byteBuffer.Length);
// Our server for this example has been designed to echo back the message
// keep reading from this stream until the message is echoed back
while (bytesReceivedFromServer < byteBuffer.Length)
{
bytesReceivedFromServer = networkStream.Read(byteBuffer, 0, byteBuffer.Length);
if (bytesReceivedFromServer == 0)
{
//exit the reading loop since there is no more data
break;
}
}
var receivedMessage = Encoding.UTF8.GetString(byteBuffer);
Console.WriteLine("Received message from server: {0}", receivedMessage);
Console.WriteLine("Press any key to exit program...");
Console.ReadLine();
}
catch (Exception ex)
{
//display any exceptions that occur to console
Console.WriteLine(ex.Message);
}
finally
{
//close the IO strem and the TCP connection
networkStream?.Close();
ourTcpClient?.Close();
}
}
}
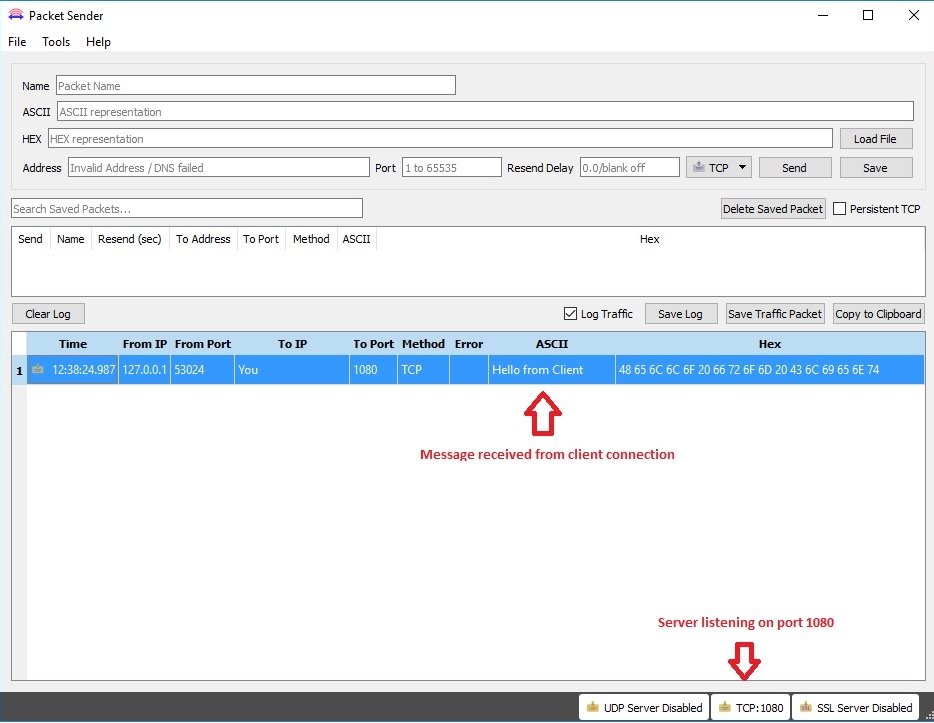
}As you can see from the code, the TcpClient class is used to establish a connection with another listener application running locally, listening on port 1080. Once a connection is established, one can read and write through this connection. When we are done, we simply close the connection. Screen capture of the PacketSender application running in TCP server mode is shown below. It shows that the server was able to receive the test message from our .NET TCP client successfully.
Art flourishes where there is a sense of adventure ~ Alfred North Whitehead
Tip: In industrial strength applications, if one cannot establish a connection right away, or if an existing connection is dropped for unforeseen reasons (if the server application crashes, or is shut down accidentally), client applications should retry a certain number of times before giving up. I will not be illustrating this functionality as it is not in the scope of this tutorial; however, it is a very useful feature to include in your HL7 application. Consider using an exception handling/retry framework like Polly if you are interested.
Step 2 of 8 - Build a simple TCP/IP server capable of receiving and echo-ing of received information
Now that we have seen a TCP client example in the previous step, here is a simple TCP server that can accept a connection from the client through a specified port, receive any information transmitted by it, and simply echo it back. It will continue running forever in a loop. We typically build server applications in .NET using the “TcpListener” class. This version of our server can accept and process only one connection at a time since all the activity related to processing happens in the same thread. Once a client connection is accepted by the server, we can read and write through the input and output streams provided by this connection.
    using System;
    using System.Net;
    using System.Net.Sockets;

    namespace SimpleTcpEchoServer
    {
        public class Program
        {
            static void Main(string[] args)
            {
                TcpListener ourTcpListener;

                try
                {
                    // Create a TCPListener to accept client connections through port 1080
                    ourTcpListener = new TcpListener(IPAddress.Any, 1080);

                    //start listening
                    ourTcpListener.Start();

                    Console.Write("Started TCP Listener...");
                }
                catch (Exception ex)
                {
                    //if there was an error starting the listener then print the error and quit
                    //In real-life, do something about this exception
                    Console.WriteLine(ex.Message);
                    return;
                }

                var receivedByteBuffer = new byte[200];

                for (;;)
                {
                    // Run the listening loop forever
                    // this will keep accepting and servicing client connections
                    TcpClient acceptTcpClient = null;
                    NetworkStream netStream = null;
                    try
                    {
                        Console.Write("Waiting for incoming client connections...");

                        acceptTcpClient = ourTcpListener.AcceptTcpClient(); // Get client connection
                        netStream = acceptTcpClient.GetStream();

                        Console.Write("Handling incoming client connection...");

                        // Keep receiving data from the client closes connection
                        var totalBytesReceivedFromClient = 0;
                        int bytesReceived; // Received byte count
                        while ((bytesReceived = netStream.Read(receivedByteBuffer, 0, receivedByteBuffer.Length)) > 0)
                        {
                            if (netStream.CanWrite)
                            {
                                //echo the received data back to the client
                                netStream.Write(receivedByteBuffer, 0, bytesReceived);
                            }

                            totalBytesReceivedFromClient += bytesReceived;
                        }

                        Console.WriteLine("Echoed {0} bytes back to the client.", totalBytesReceivedFromClient);
                    }
                    catch (Exception e)
                    {
                        //print any exceptions during the communications to the console
                        //in real-life, do something about this exception
                        Console.WriteLine(e.Message);
                    }
                    finally
                    {
                        // Close the stream and the connection with the client
                        netStream?.Close();
                        netStream?.Dispose();
                        acceptTcpClient?.Close();
                    }
                }
            }
        }
    }
Screen capture of the PacketSender application running in TCP client mode is shown below. This software utility helps us test our .NET TCP server as a client in this case. It proves that the client was able to send and receive the test message to and from our .NET TCP server successfully. You should be able to hit the "Send" button repeatedly while the .NET TCP server is running, and you should continue to see echo responses from this server.

Tip: In production HL7 server applications, you will have to ensure that the server does not crash by implementing rugged error handling as well as “auto-restart” feature in case the server does crash for some reason. Also, you will want to send error notifications through emails in case manual intervention is required quickly or write to event logs of the operating system. Like I mentioned previously, consider using a exception handling/retry framework like Polly if you are interested.
Step 3 of 8 - Build support for the server to handle many concurrent connections from clients
The client and server examples illustrated so far are extremely simplified examples to help you understand the basics of TCP/IP communications. Also, the server we implemented in the previous step is not capable of handling multiple connections at the same time. This is because the TCP Listener class uses blocking IO and hence will not service any other client requests unless it is able to pass on the incoming client connection to be processed in a separate thread. To handle concurrent connections and also help manage server resources efficiently, you will have to use Threads, or alternatively the new Async mechanisms that are available in more recent versions of the .NET framework. I will use Thread class here as it offers the most simple and straight forward way to understand this aspect of connection processing between TCP client and TCP listener classes. However, I would encourage you to review the Async delegates and callback mechanisms that are available in the .NET framework if you want to understand the full spectrum of features that are available in .NET framework. The good news is that they simply build on these foundational classes that we use here and provide additional features that permit us to control many other aspects of socket communication activity. The code below shows a very simple example of a TCP server that can handle multiple connections and echo any data that is transmitted by the clients.
    using System;
    using System.Net;
    using System.Net.Sockets;
    using System.Threading;

    namespace MultiThreadedTcpEchoServer
    {
        public class Program
        {
            static void Main(string[] args)
            {
                var ourTcpServer = new OurSimpleMultiThreadedTcpServer();
                //starting the server
                ourTcpServer.StartOurTcpServer(1080);

                Console.WriteLine("Press any key to exit program...");
                Console.ReadLine();
            }
        }

        class OurSimpleMultiThreadedTcpServer
        {
            private TcpListener _tcpListener;

            public void StartOurTcpServer(int portNumberToListenOn)
            {
                try
                {
                    _tcpListener = new TcpListener(IPAddress.Parse("127.0.0.1"), 1080);

                    //start the TCP listener that we have instantiated
                    _tcpListener.Start();

                    Console.WriteLine("Started server successfully...");

                    while (true)
                    {
                        //wait for client connections to come in
                        var incomingTcpClientConnection = _tcpListener.AcceptTcpClient();

                        Console.WriteLine("Accepted incoming client connection...");

                        //create a new thread to process this client connection
                        var clientProcessingThread = new Thread(ProcessClientConnection);

                        //start processing client connections to this server
                        clientProcessingThread.Start(incomingTcpClientConnection);
                    }

                }
                catch (Exception ex)
                {
                    //print any exceptions during the communications to the console
                    //in real-life, do something about this exception
                    Console.WriteLine(ex.Message);
                }
                finally
                {
                    //stop the TCP listener before you dispose of it
                    _tcpListener?.Stop();
                }
            }

            private void ProcessClientConnection(object argumentPassedForThreadProcessing) {

                //the argument passed to the thread delegate is the incoming tcp client connection
                var tcpClient = (TcpClient) argumentForThreadProcessing;

                var receivedByteBuffer = new byte[200];
                var netStream = tcpClient.GetStream();

                try
                {
                    // Keep receiving data from the client closes connection
                    var totalBytesReceivedFromClient = 0;
                    int bytesReceived; // Received byte count

                    //keeping reading until there is data available from the client and echo it back
                    while ((bytesReceived = netStream.Read(receivedByteBuffer, 0, receivedByteBuffer.Length)) > 0)
                    {
                        if (netStream.CanWrite)
                        {
                            //echo the received data back to the client
                            netStream.Write(receivedByteBuffer, 0, bytesReceived);
                            netStream.Flush();
                        }

                        totalBytesReceivedFromClient += bytesReceived;
                    }

                    Console.WriteLine("Echoed {0} bytes back to the client.", totalBytesReceivedFromClient);
                }
                catch (Exception e)
                {
                    //print any exceptions during the communications to the console
                    //in real-life, always do something about exceptions
                    //in real-life, do something about this exception
                    Console.WriteLine(e.Message);
                }
                finally
                {
                    // Close the stream and the connection with the client
                    netStream.Close();
                    netStream.Dispose();
                    tcpClient.Close();
                }

            }
        }
    }
Tip: In many HL7 systems in use around the world, multiple clients may attempt to connect to a server at the same time (either on different ports, or on the same port). The server application must be able to accept all these connections without too much delay, and then receive, process and acknowledge any information received from each client.
Step 4 of 8 - Add MLLP and message acknowledgement features into the server
Even though the examples illustrated so far allow the client and server to transmit simple text messages back and forth, this will not be enough to communicate with HL7 systems. Communication with HL7 systems will require the use of MLLP protocol that I described at the start of the tutorial with a message acknowledgment as well. In this step, we will take our existing server and add additional code to enable MLLP support. We will also implement functionality in the server to create and transmit a simple acknowledgement message back to the client application after.
More on MLLP
At the start of this tutorial, I described the MLLP protocol as a wrapping protocol where the core HL7 message is enveloped in special characters to signal the start and end of transmission of message information to the receiving application. When dealing with MLLP, there are essentially three character groups that you will configure and use. They are start block, end block and segment separator. HL7 messages transmitted using the MLLP protocol are prefixed with a start block character, message segments are terminated with a segment separator, and the messages themselves are then terminated with two characters namely an end block and a carriage return character. Most often, the character typically used to signify start block is a VT (vertical tab), which is ASCII 11. The FS (file separator), ASCII 28, is used to signify end block, and CR (ASCII 13), is used for segment separator. Sites may decide to override and use their own settings in some situations. The start of block, segment separator and end of block characters are denoted by "SB", "CR" and "EB" in the message example below.
Here is an example of an observation request HL7 message “enveloped” for transmission using the MLLP-related wrapping characters as described in the previous paragraph:
<SB>MSH^~\&199809091533ORU^R01856369D2.2<CR>
PID139385000343456<CR>
ORC123112312RAD19980909-0005<CR><EB><CR>
“Pain and suffering are always inevitable for a large intelligence and a deep heart. The really great men must, I think, have great sadness on earth.” ~ Fyodor Dostoyevsky (from ‘Crime and Punishment’)
Step 5 of 8 - Write a small TCP/IP client that will transmit a dummy MLLP-wrapped HL7 message
Here is the original TCP client modified to transmit a sample HL7 message. Notice how the test message is wrapped in the special characters as explained earlier (highlighted in bold).
    using System;
    using System.Net;
    using System.Net.Sockets;
    using System.Text;

    namespace SimpleMllpHl7ClientAdvanced
    {
        public class Program
        {
            private static char END_OF_BLOCK = '\u001c';
            private static char START_OF_BLOCK = '\u000b';
            private static char CARRIAGE_RETURN = (char)13;

            static void Main(string[] args)
            {
                TcpClient ourTcpClient = null;
                NetworkStream networkStream = null;

                var testHl7MessageToTransmit = new StringBuilder();

                //a HL7 test message that is enveloped with MLLP as described in my article
                testHl7MessageToTransmit.Append(START_OF_BLOCK)
                    .Append("MSH|^~\\&|AcmeHIS|StJohn|CATH|StJohn|20061019172719||ORM^O01|MSGID12349876|P|2.3")
                    .Append(CARRIAGE_RETURN)
                    .Append("PID|||20301||Durden^Tyler^^^Mr.||19700312|M|||88 Punchward Dr.^^Los Angeles^CA^11221^USA|||||||")
                    .Append(CARRIAGE_RETURN)
                    .Append("PV1||O|OP^^||||4652^Paulson^Robert|||OP|||||||||9|||||||||||||||||||||||||20061019172717|20061019172718")
                    .Append(CARRIAGE_RETURN)
                    .Append("ORC|NW|20061019172719")
                    .Append(CARRIAGE_RETURN)
                    .Append("OBR|1|20061019172719||76770^Ultrasound: retroperitoneal^C4|||12349876")
                    .Append(CARRIAGE_RETURN)
                    .Append(END_OF_BLOCK)
                    .Append(CARRIAGE_RETURN);

                try
                {
                    //initiate a TCP client connection to local loopback address at port 1080
                    ourTcpClient = new TcpClient();

                    ourTcpClient.Connect(new IPEndPoint(IPAddress.Loopback, 1080));

                    Console.WriteLine("Connected to server....");

                    //get the IO stream on this connection to write to
                    networkStream = ourTcpClient.GetStream();

                    //use UTF-8 and either 8-bit encoding due to MLLP-related recommendations
                    var sendMessageByteBuffer = Encoding.UTF8.GetBytes(testHl7MessageToTransmit.ToString());

                    if (networkStream.CanWrite)
                    {
                        //send a message through this connection using the IO stream
                        networkStream.Write(sendMessageByteBuffer, 0, sendMessageByteBuffer.Length);

                        Console.WriteLine("Data was sent data to server successfully....");

                        var receiveMessageByteBuffer = Encoding.UTF8.GetBytes(testHl7MessageToTransmit.ToString());
                        var bytesReceivedFromServer = networkStream.Read(receiveMessageByteBuffer, 0, receiveMessageByteBuffer.Length);

                        // Our server for this example has been designed to echo back the message
                        // keep reading from this stream until the message is echoed back
                        while (bytesReceivedFromServer > 0)
                        {
                            if (networkStream.CanRead)
                            {
                                bytesReceivedFromServer = networkStream.Read(receiveMessageByteBuffer, 0, receiveMessageByteBuffer.Length);
                                if (bytesReceivedFromServer == 0)
                                {
                                    break;
                                }
                            }

                        }
                        var receivedMessage = Encoding.UTF8.GetString(receiveMessageByteBuffer);

                        Console.WriteLine("Received message from server: {0}", receivedMessage);
                    }

                    Console.WriteLine("Press any key to exit...");
                    Console.ReadLine();
                }
                catch (Exception ex)
                {
                    //display any exceptions that occur to console
                    Console.WriteLine(ex.Message);
                }
                finally
                {
                    //close the IO strem and the TCP connection
                    networkStream?.Close();
                    ourTcpClient?.Close();
                }
            }
        }
    }
Step 6 of 8 - Modify the server class to build MLLP-based parsing functionality
In this step, we will add logic inside the ProcessClientConnection method to parse the HL7 message data from within the MLLP envelope. This parsing is done by reading the TCP/IP byte data being received until the start and the end of the block markers are both recognized in the data signaling that the entire HL7 message has arrived on the server. We then generate a HL7 message acknowledgement for this incoming message to send back to the client. We will look at how message acknowledgements are generated in the next step. The code below illustrates the modifications required to our HL7 server to become "MLLP-enabled".
    private void ProcessClientConnection(object argumentPassedForThreadProcessing) {

        //the argument passed to the thread delegate is the incoming tcp client connection
        var tcpClientConnection = (TcpClient)argumentForThreadProcessing;
        Console.WriteLine("A client connection was initiated from " + tcpClientConnection.Client.RemoteEndPoint);

        var receivedByteBuffer = new byte[200];
        var netStream = tcpClientConnection.GetStream();

        try
        {
            // Keep receiving data from the client closes connection
            int bytesReceived; // Received byte count
            var hl7Data = string.Empty;

            //keeping reading until there is data available from the client and echo it back
            while ((bytesReceived = netStream.Read(receivedByteBuffer, 0, receivedByteBuffer.Length)) > 0)
            {
                hl7Data += Encoding.UTF8.GetString(receivedByteBuffer, 0, bytesReceived);

                // Find start of MLLP frame, a VT character ...
                var startOfMllpEnvelope = hl7Data.IndexOf(START_OF_BLOCK);
                if (startOfMllpEnvelope >= 0)
                {
                    // Now look for the end of the frame, a FS character
                    var end = hl7Data.IndexOf(END_OF_BLOCK);
                    if (end >= startOfMllpEnvelope) //end of block received
                    {
                        //if both start and end of block are recognized in the data transmitted, then extract the entire message
                        var hl7MessageData = hl7Data.Substring(startOfMllpEnvelope + 1, end - startOfMllpEnvelope);

                        //create a HL7 acknowledgement message
                        var ackMessage = GetSimpleAcknowledgementMessage(hl7MessageData);

                        Console.WriteLine(ackMessage);

                        //echo the received data back to the client
                        var buffer = Encoding.UTF8.GetBytes(ackMessage);

                        if (netStream.CanWrite)
                        {
                            netStream.Write(buffer, 0, buffer.Length);

                            Console.WriteLine("Ack message was sent back to the client...");
                        }
                    }
                }

            }


        }
        catch (Exception e)
        {
            //print any exceptions during the communications to the console
            Console.WriteLine(e.Message);
        }
        finally
        {
            // Close the stream and the connection with the client
            netStream.Close();
            netStream.Dispose();
            tcpClientConnection.Close();
        }

    }
Step 7 of 8 - Modify the server class to build HL7 message acknowledgement functionality
Earlier in this tutorial, I described that HL7 2.x systems will usually communicate a response back for incoming messages. This message acknowledgement among other things will include the message control id that was transmitted in the original message so that the sending system can be sure that the message was accepted by the destination. To enable this functionality, we will add two additional methods to our .NET HL7 server. The GetSimpleAcknowledgementMessage method will help us build the message acknowledgment which will consist of a "MSH" and "MSA" message segment. The GetMessageControlID method on the other hand will help retrieve the message control id from the incoming message that we are responding to. Please note that in real-life, you will transmit other field data in the MSH and MSA segments such as sending facility, sending application, version of the application, and other useful information.
    private string GetSimpleAcknowledgementMessage(string incomingHl7Message) {
        if (string.IsNullOrEmpty(incomingHl7Message))
            throw new ApplicationException("Invalid HL7 message for parsing operation. Please check your inputs");

        //retrieve the message control ID of the incoming HL7 message
        var messageControlId = GetMessageControlID(incomingHl7Message);

        //build an acknowledgement message and include the control ID with it
        var ackMessage = new StringBuilder();
        ackMessage = ackMessage.Append(START_OF_BLOCK)
            .Append("MSH|^~\\&|||||||ACK||P|2.2")
            .Append(CARRIAGE_RETURN)
            .Append("MSA|AA|")
            .Append(messageControlId)
            .Append(CARRIAGE_RETURN)
            .Append(END_OF_BLOCK)
            .Append(CARRIAGE_RETURN);

        return ackMessage.ToString();
    }
private string GetMessageControlID(string incomingHl7Message) {
var fieldCount = 0;
//parse the message into segments using the end of segment separter
var hl7MessageSegments = incomingHl7Message.Split(CARRIAGE_RETURN);
//tokenize the MSH segment into fields using the field separator
var hl7FieldsInMshSegment = hl7MessageSegments[0].Split(FIELD_DELIMITER);
//retrieve the message control ID in order to reply back with the message ack
foreach (var field in hl7FieldsInMshSegment)
{
if (fieldCount == MESSAGE_CONTROL_ID_LOCATION)
{
return field;
}
fieldCount++;
}
return string.Empty; //you can also throw an exception here if you wish
}Step 8 of 8 - Put it all together
Now that we have all the changes in place, using our MLLP server should be easy. Code below shows how to initiate our MLLP server which will listen on port 1080 for incoming client connections.
using System;
namespace SimpleMultiThreadedMllpHl7Server
{
public class Program
{
static void Main(string[] args)
{
var ourHl7Server = new OurSimpleMultiThreadedMllpHl7Server();
ourHl7Server.StartServer(1080);
Console.WriteLine("Press any key to exit program...");
Console.ReadLine();
}
}
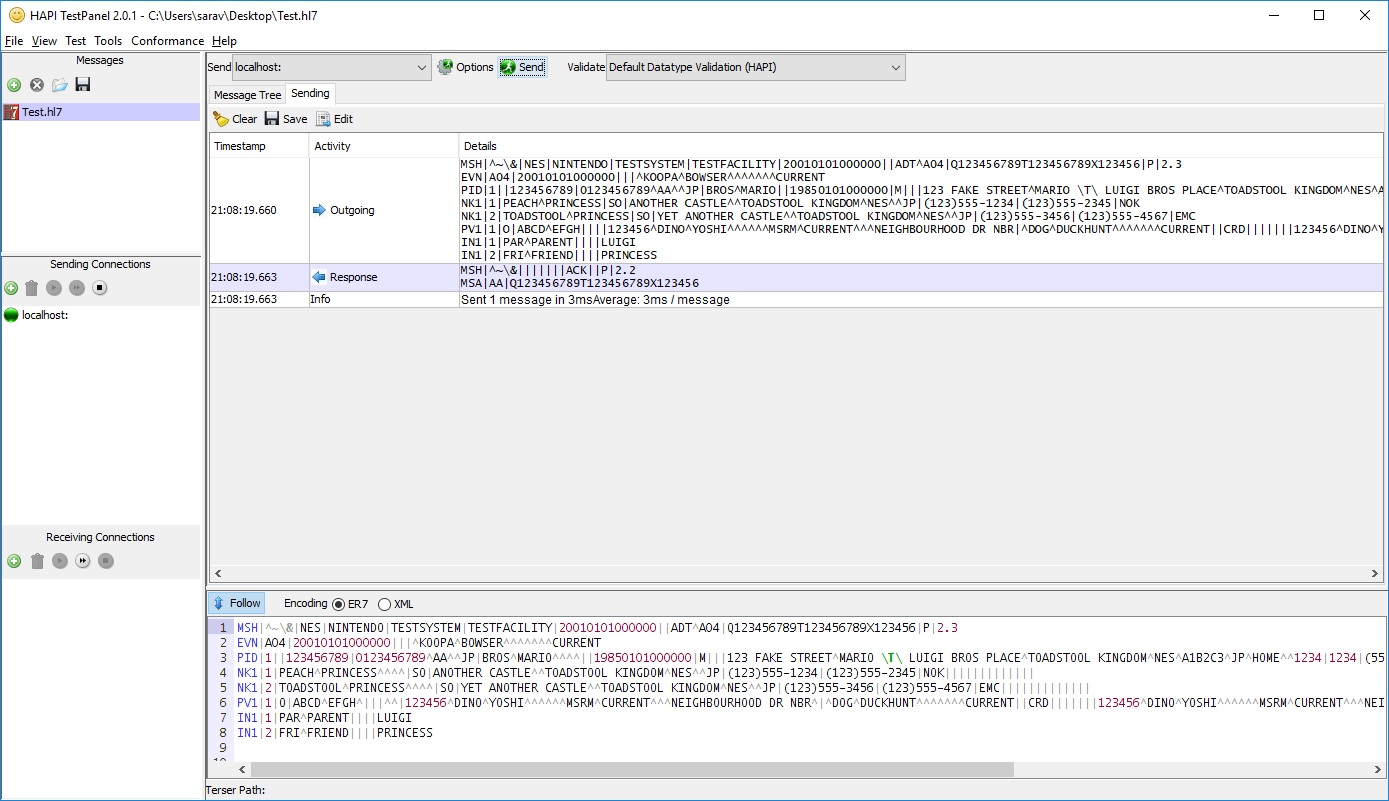
}Screen capture below shows me successfully communicating with our .NET MLLP server using a third party testing called HAPI Test Panel which some of you saw in my previous articles. You can use this or any other HL7 software to communicate with our minimal MLLP-based HL7 server.
We are done. We have essentially seen all the bits and pieces needed to assemble a custom HL7 application from scratch if you needed to. Often, instead of re-inventing the wheel, a HL7 programmer will use either freeware or commercial toolkits to build his/her HL7 messaging application. However, even when dealing with toolkits, a basic understanding of sockets, the MLLP protocol as well as message acknowledgement fundamentals that were covered in this tutorial is required. Please see the other articles in my HL7 article series where I cover two open source HL7 libraries called "HAPI" and "NHAPI" which make the task of HL7 2.x programming a bit easier for Java and .NET programmers respectively.
You can find the full source code used in this tutorial on GitHub here
Conclusion
Building robust HL7 systems capable of running 24/7 and unattended is not easy. My goal in this article was to simply provide a rudimentary understanding of all the basics of HL7 programming including the MLLP protocol and how it is conceptually implemented. Production-ready servers will obviously need to consider many other factors such as the following:
- Message parsing support for the hundreds of message types and triggers specified in the HL7 2.x standard
- Support for the various message acknowledgment modes specified in the HL7 standard
- Error handling, logging, notifications, retry policies, timeout settings to troubleshoot and manage daily operations
- MLLP envelope and special character formatting-related information to account for character encodings in use at various geographical settings
A well-designed HL7 system will include many if not all of these features which will result in a sturdy and yet seamless HL7 system capable of interfacing with a variety of commercial as well as open-source healthcare systems out on the market. However, these topics are beyond the scope of this introductory article which has already proved a bit lengthier than I had originally planned. In the next tutorial in my HL7 article series, I will cover a .NET HL7 framework called "NHapi" that offers significant support for HL7 message processing to help make our lives a bit easier. See you then!