DICOM Basics using Java - Understanding DICOM Directory
Introduction
This is part of my series of articles on the DICOM standard. If you are totally new to DICOM, please have a quick look at my earlier article titled “Introduction to the DICOM Standard” for a quick introduction to the standard. You may also want to look at my other tutorials titled “DICOM Basics using Java - Making Sense of the DICOM File” and “DICOM Basics using Java - Creating a DICOM File” to understand the structure of a DICOM file as well as how it is created. This should aid in the understanding of the material in this tutorial as they show you how DICOM objects are encoded. This tutorial also assumes that you know the basics of Java or any equivalent object-oriented language such as C# or C++.
If you are dealing with modalities such as CT or MR, you will often deal with large numbers of images generated as a result of a scan procedure (sometimes hundreds if not thousands). The PACS server or an offline archive/media such as CD/DVD may store these image sets in a nested directory structure (by patient, by study and by series). The standard restricts the file names/identifiers contained within to 8 characters (either uppercase alphabetic characters and numbers only) to keep in conformity with legacy/historical requirements. It also states that no information must be inferred/extracted from these names. This makes total sense as there is a risk of attributing an image to the wrong patient, study or series and can lead to some dire consequences for diagnosis (and is reason that DICOM objects have information contained within in the form of DICOM elements or tags). However, searching through these directories and the large number of images they contain when needing to perform any diagnostic, research or error correction procedures even with these elements/tags is not a trivial task as you have to process each file individually. This is where DICOM directory files come in.
“You will never find time for anything. If you want time, you must make it.” ~ Charles Buxton
The standard mandates the use of a media directory file called the DICOMDIR file (please note that this is a file and not a directory as most people mistakenly believe) which provide a number of benefits including indexing as well as summary level information regarding the files contained within (called the File-set). A File-set is simply a collection of files that share a common naming space within which any identifiers used for these files (called File IDs) have to be unique. The DICOM directory file itself is encoded as an SOP instance and has a Media Storage SOP Instance UID in its meta information similar to any other DICOM file that we have seen so far. The file must be encoded by any application creating it according to the specifications in Part 10 of the DICOM standard. The standard stipulates that the processing application should not infer anything from the order of the files in the file-set and that there should be no semantics attached to it. With the help of the DICOMDIR file, it is then possible to browse through all images on the medium of storage you are dealing with without having to read the entire directory structure and the images. This approach speeds up search times by a huge margin especially when you are dealing with large sets of files. Please see Part 10 of the DICOM standard that deals with this aspect of image management in more detail.
In this tutorial, I will show how to read as well as create DICOM directories if you have to when developing custom software applications.
The PixelMed Java DICOM Toolkit - Quick Overview
For the purposes of illustrating many aspects of DICOM that I plan to cover in this tutorial series, I will be using a freely available and powerful DICOM toolkit called PixelMed Java DICOM Toolkit. This is a completely stand-alone DICOM toolkit that provides functionality for DICOM file and directory processing, image viewing as well as DICOM networking-related operations. This toolkit is completely free for both commercial or non-profit use. It is well documented and also has a small discussion forum and mailing list for users. The list of features contained within this toolkit is quite comprehensive. Please keep in mind that the use of this toolkit in my tutorial does not in anyway imply my official endorsement of it for implementing a production application. Every situation is unique, and only you are ultimately in the best position to decide that. This article is also not meant to be a tutorial on this toolkit, and my focus here is simply to tie DICOM theory to what a practical (although simple) implementation might look like. So, if your goal is to learn how to use the PixelMed library, I would encourage you to visit its website or check out the discussion forum or StackOverflow discussion pages for any assistance.
Before We Get Started…
Much like my previous programming examples, I will use the most bare minimum code and approach to help illustrate the concepts that I cover in this tutorial. This means that the code I write here is best suited to simply show the concept that I am trying to explain and is not necessarily the most efficient code to deploy in real life and in your production application.
To get started, you will need to configure a few things on your machine including a Java development environment as well as the PixelMed toolkit before you can run the example if you want to try this out yourself.
- Download and install the Eclipse Java IDE from here (or use any other IDE you prefer)
- Download the PixelMed toolkit library from here
- Ensure that the PixelMed.jar library is included in your Java project’s class path (some examples may require additonal runtime dependencies such as JAI Image IO Tools that can be found on PixelMed software download. Look for a tar compressed file called pixelmedjavadicom_dependencyrelease.YYYYMMDD.tar.bz2 or something similar)
- You can find the source code and images used in this tutorial on GitHub
- You can download more DICOM images from this site if you want as well
Reading DICOM Directory Files
The PixelMed library provides a number of classes to perform read and write operations on DICOM Directory files. These classes can be found in the com.pixelmed.dicom package of the library. The main class that we will use to demonstrate the read operation is DicomDirectory. Let us begin our exploration of this useful class by reading the DICOMDIR file located at a specific path and simply listing its contents to console. This will give us an idea about the information coded within.
The code to open a DICOM directory file and list the contents to console is given below. The output seen in the console below the code should help reinforce the idea of the four-level hierarchy by which images are organized often on DICOM media (which is by patient, then by study, then by series and the images). The console listing shows the patient information (info is anonymized here), then the study information (including study number), then the series number (and modality) followed by the image information containing the image index, the image type and the transfer syntax used to encode the image. There could be multiple studies here for each patient, with each each study containing multiple series of images as well. I have included a set of DICOM images containing a DICOMDIR in a zip file for you to try out this example yourself. These images have all anonymized to protect the information on patient on whom the scans were taken.
    package com.saravanansubramanian.dicom.pixelmedtutorial;

    import java.io.File;
    import com.pixelmed.dicom.AttributeList;
    import com.pixelmed.dicom.DicomDirectory;
    import com.pixelmed.dicom.DicomInputStream;

    public class ReadDicomDirectoryFileDemo {

        public static void main(String[] args) {

            String dicomDirectoryFileName = "D:\\JavaProjects\\Sample Images\\DICOMDIR_Example\\DICOMDIR";
            try {
                AttributeList list = new AttributeList();
                list.read(new DicomInputStream(new File(dicomDirectoryFileName)));
                DicomDirectory dicomDirectory = new DicomDirectory(list);
                System.out.println(dicomDirectory.toString());
            } catch (Exception e) {
                e.printStackTrace(); //in real life, do something about this exception
            }

        }

    }
Partial output of running the code above is shown below:
Top
Patient CompressedSamples^CT1 1CT1
Study 20040826 1CT1 e+1
Series 1 {CT}
Image 1 {CT,AXIAL} - Uncompressed
Image 2 {CT,DERIVED,AXIAL} - JPEG 2000 reversible (lossless)
Image 3 {CT,DERIVED,AXIAL} - JPEG 2000 irreversible (lossy)
Image 4 {CT,DERIVED,AXIAL} - JPEG lossless SV1
Image 6 {CT,DERIVED,AXIAL} - JPEG-LS lossless
Image 7 {CT,DERIVED,AXIAL} - JPEG-LS near-lossless
Patient CompressedSamples^CT2 2CT2
Study 20040826 2CT2
Series 1 {CT}
Image 1 {CT,AXIAL} - Uncompressed
Image 2 {CT,DERIVED,AXIAL} - JPEG 2000 reversible (lossless)
Image 3 {CT,DERIVED,AXIAL} - JPEG 2000 irreversible (lossy)
Image 4 {CT,DERIVED,AXIAL} - JPEG lossless SV1
Image 6 {CT,DERIVED,AXIAL} - JPEG-LS lossless
Image 7 {CT,DERIVED,AXIAL} - JPEG-LS near-lossless
Patient CompressedSamples^MG1 3MG1
Study 20040826 3MG1 Malignant mass with micro-calcifications
Series 1 {RG}
Image 1 {SC} - Uncompressed
Image 2 {SC,DERIVED} - JPEG 2000 reversible (lossless)
Image 3 {SC,DERIVED} - JPEG 2000 irreversible (lossy)
Image 4 {SC,DERIVED} - JPEG lossless SV1
Image 5 {SC,DERIVED} - JPEG lossy
Image 6 {SC,DERIVED} - JPEG-LS lossless
Image 7 {SC,DERIVED} - JPEG-LS near-lossless
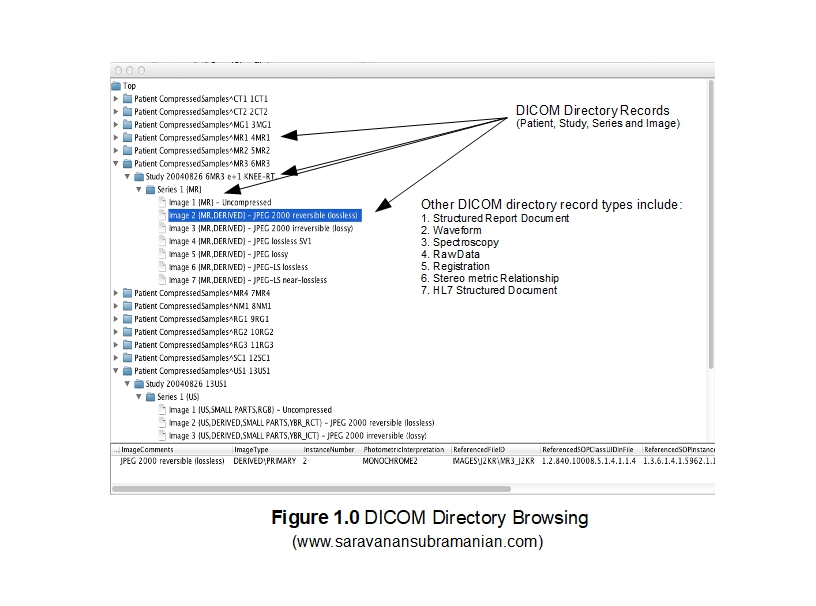
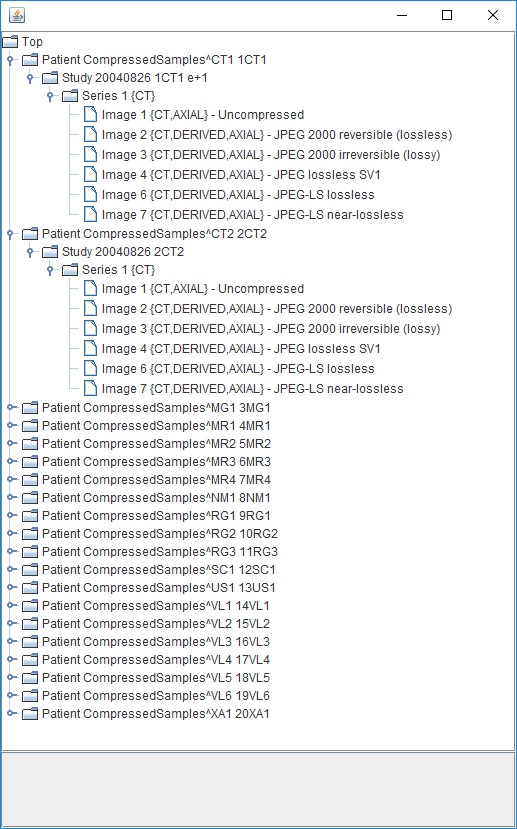
PixelMed library provides a UI class called DicomDirectoryBrowser that enables us to visualize this hierarchy through the use of a Java swing utility class called JTree. I have provided you a short code example below that will help illustrate this. Running this code will launch an instance of the JTree component displaying the entire DICOM Directory information in the form of a hierarchy (first by patient, then by study, then by series and then by image). I have provided a screen capture of this window below the code listing below. The type of hierarchical records contained within any DICOM Directory object are defined using something called DICOM Directory Records which may contain additional information about the referenced study, series or image for instance.
Click on each of the levels to expand and navigate through the various hierarchies contained within this DICOM directory file. Please also note that the directory record information contained within is also shown at the bottom of the window as you click on each level. Something I also want to mention here is that DICOM directories need not contain all levels necessarily or necessarily images.
    package com.saravanansubramanian.dicom.pixelmedtutorial;

    import com.pixelmed.dicom.AttributeList;
    import com.pixelmed.dicom.DicomDirectoryBrowser;

    public class VisualizeDicomDirectoryDetailsDemo {

        public static void main(String[] args) {

            String dicomDirectoryFileName = "D:\\JavaProjects\\Sample Images\\DICOMDIR_Example\\DICOMDIR";
            try {
                AttributeList list = new AttributeList();
                list.read(dicomDirectoryFileName);
                DicomDirectoryBrowser.main(new String[] {dicomDirectoryFileName});

            } catch (Exception e) {
                e.printStackTrace(); //in real life, do something about this exception
            }

        }

    }
Writing DICOM Directory Files
The DicomDirectory class also provides the ability to create DICOMDIR objects based on existing DICOM image files and other directory record types shown in my diagram above. As you recall from the previous section, the instance of this class helps store the memory representation of a DICOM directory file that was read in. The reverse is also true. We can create create a brand new DICOM directory file using this class through one of several ways which includes copying an existing DICOM directory file or by using existing DICOM files contained in a specified directory. The full file-set information of the DICOM directory then can be retrieved at anytime using various methods in this class. One method that is particularly useful is findAllContainedReferencedFileNamesAndTheirRecords. This method lists all the referenced file names contained in the directory file and returns a HashMap collection listing the files names as keys and a Directory Record associated with this file as the value. You can then use this information to retrieve any additional information regarding the files. My small code listing below shows how to create a brand new DICOM directory file which includes references to a number of images as well as how to display this file set after.
    package com.saravanansubramanian.dicom.pixelmedtutorial;

    import java.io.File;
    import com.pixelmed.dicom.DicomDirectory;
    import com.pixelmed.dicom.DicomDirectoryBrowser;

    public class CreatingDicomDirectoryFileDemo {

    public static void main(String[] args) {

            String dicomRootDirectory = "D:\\JavaProjects\\Sample Images";
            String dicomDirectoryFileName = dicomRootDirectory + File.separatorChar + "SampleDICOMDIR";

            //These are the image files that we will include as file-set
            //remember, they may be under different directories such as patient, study & series folders usually
            String imageFile1 = dicomRootDirectory + File.separatorChar + "CR-MONO1-10-chest";
            String imageFile2 = dicomRootDirectory + File.separatorChar + "CT-MONO2-12-lomb-an2";
            String imageFile3 = dicomRootDirectory + File.separatorChar + "CT-MONO2-16-ankle";
            String imageFile4 = dicomRootDirectory + File.separatorChar + "CT-MONO2-16-brain";

            try {
                String[] sourceFiles = new String[] {imageFile1, imageFile2, imageFile3, imageFile4};
                DicomDirectory dicomDirectory = new DicomDirectory(sourceFiles);
                dicomDirectory.write(dicomDirectoryFileName);
                System.out.println(dicomDirectory);
                DicomDirectoryBrowser.main(new String[] {dicomDirectoryFileName});
            }
            catch (Exception e) {
                //In real-life, do something about this exception
                e.printStackTrace();
            }

        }

    }
You will notice by the output shown in the screen capture above that the DicomDirectory class automatically figures the four level hierarchy by reading the meta information of the image files as they contain the necessary attributes. This may not be the case sometimes where you simply have say only raw data, and you have to supply the additional attributes as necessary. I will leave that to explore for yourself as it is pretty straightforward as there is another constructor on this class that takes an AttributeList as an additional parameter. Please note that for the sake of keeping the demonstration simple and easy to illustrate, I have put the input files in the same source directory. This will not be the case for most operations in the real world though. You will probably have files in different directories (for various patients, studies and series). And so, you will have to take this fact into consideration by passing the file paths for the various files when creating DICOM directory files. If you want to do this, it is pretty straight forward as well using PixelMed library. Use the listFilesRecursively method in the FileUtilities class in the com.pixelmed.utils package. This method recursively traverses any root directory you specify and all its sub-directories and produces a full list of files contained inside. Creating a DICOM directory file is made much easier.
Testing Tools for DICOM Directory Troubleshooting
It is useful to have additional DICOM-related testing tools to be a companion during custom DICOM software development. Many of these tools provide us with the ability to troubleshoot and verify DICOM directory information. One tool that I have used in the past and have really liked is DCMTK. This toolkit comes with many standalone testing utilities that help you test various aspects of DICOM through a command line interface. The dcmdump command is the one that I will use here to show the contents of the DICOM directory. Note: Only a portion of the results generated are shown below.
C:\dcmtk-3.6.5-win64-dynamic\bin>dcmdump.exe C:\DicomDirDemo\DICOMDIR

# Dicom-File-Format

# Dicom-Meta-Information-Header
# Used TransferSyntax: Little Endian Explicit
(0002,0000) UL 204                                      #   4, 1 FileMetaInformationGroupLength
(0002,0001) OB 00\01                                    #   2, 1 FileMetaInformationVersion
(0002,0002) UI =MediaStorageDirectoryStorage            #  20, 1 MediaStorageSOPClassUID
(0002,0003) UI [1.3.6.1.4.1.30071.8.220045550516071.6121351283511893] #  52, 1 MediaStorageSOPInstanceUID
(0002,0010) UI =LittleEndianExplicit                    #  20, 1 TransferSyntaxUID
(0002,0012) UI [1.3.6.1.4.1.30071.8]                    #  20, 1 ImplementationClassUID
(0002,0013) SH [fo-dicom 4.0.0]                         #  14, 1 ImplementationVersionName
(0002,0016) AE [DESKTOP-EIQC7KP]                        #  16, 1 SourceApplicationEntityTitle

# Dicom-Data-Set
# Used TransferSyntax: Little Endian Explicit
(0004,1130) CS (no value available)                     #   0, 0 FileSetID
(0004,1200) up 402                                      #   4, 1 OffsetOfTheFirstDirectoryRecordOfTheRootDirectoryEntity
(0004,1202) up 13780                                    #   4, 1 OffsetOfTheLastDirectoryRecordOfTheRootDirectoryEntity
(0004,1212) US 0                                        #   2, 1 FileSetConsistencyFlag
(0004,1220) SQ (Sequence with undefined length #=80)    # u/l, 1 DirectoryRecordSequence
  (fffe,e000) na "Directory Record" PATIENT #=9           # u/l, 1 Item
  #  offset=$402
    (0004,1400) up 1154                                     #   4, 1 OffsetOfTheNextDirectoryRecord
    (0004,1410) US 65535                                    #   2, 1 RecordInUseFlag
    (0004,1420) up 546                                      #   4, 1 OffsetOfReferencedLowerLevelDirectoryEntity
    (0004,1430) CS [PATIENT]                                #   8, 1 DirectoryRecordType
    (0008,0005) CS [ISO_IR 100]                             #  10, 1 SpecificCharacterSet
    (0010,0010) PN [CompressedSamples^CT1]                  #  22, 1 PatientName
    (0010,0020) LO [1CT1]                                   #   4, 1 PatientID
    (0010,0030) DA (no value available)                     #   0, 0 PatientBirthDate
    (0010,0040) CS [O]                                      #   2, 1 PatientSex
  (fffe,e00d) na "ItemDelimitationItem"                   #   0, 0 ItemDelimitationItem
  (fffe,e000) na "Directory Record" STUDY #=11            # u/l, 1 Item
  #  offset=$546
    (0004,1400) up 0                                        #   4, 1 OffsetOfTheNextDirectoryRecord
    (0004,1410) US 65535                                    #   2, 1 RecordInUseFlag
    (0004,1420) up 740                                      #   4, 1 OffsetOfReferencedLowerLevelDirectoryEntity
    (0004,1430) CS [STUDY]                                  #   6, 1 DirectoryRecordType
    (0008,0005) CS [ISO_IR 100]                             #  10, 1 SpecificCharacterSet
    (0008,0020) DA [20040826]                               #   8, 1 StudyDate
    (0008,0030) TM [185059]                                 #   6, 1 StudyTime
    (0008,0050) SH (no value available)                     #   0, 0 AccessionNumber
    (0008,1030) LO [e+1]                                    #   4, 1 StudyDescription
    (0020,000d) UI [1.3.6.1.4.1.5962.1.2.1.20040826185059.5457] #  42, 1 StudyInstanceUID
    (0020,0010) SH [1CT1]                                   #   4, 1 StudyID
  (fffe,e00d) na "ItemDelimitationItem"                   #   0, 0 ItemDelimitationItem
  (fffe,e000) na "Directory Record" SERIES #=10           # u/l, 1 Item
  #  offset=$740
    (0004,1400) up 0                                        #   4, 1 OffsetOfTheNextDirectoryRecord
    (0004,1410) US 65535                                    #   2, 1 RecordInUseFlag
    (0004,1420) up 924                                      #   4, 1 OffsetOfReferencedLowerLevelDirectoryEntity
    (0004,1430) CS [SERIES]                                 #   6, 1 DirectoryRecordType
    (0008,0005) CS [ISO_IR 100]                             #  10, 1 SpecificCharacterSet
    (0008,0021) DA [19970430]                               #   8, 1 SeriesDate
    (0008,0031) TM [112749]                                 #   6, 1 SeriesTime
    (0008,0060) CS [CT]                                     #   2, 1 Modality
    (0020,000e) UI [1.3.6.1.4.1.5962.1.3.1.1.20040826185059.5457] #  44, 1 SeriesInstanceUID
    (0020,0011) IS [1]                                      #   2, 1 SeriesNumber
  (fffe,e00d) na "ItemDelimitationItem"                   #   0, 0 ItemDelimitationItem
  (fffe,e000) na "Directory Record" IMAGE #=10            # u/l, 1 Item
  #  offset=$924  refFileID="000001\CT1_UNC"
    (0004,1400) up 0                                        #   4, 1 OffsetOfTheNextDirectoryRecord
    (0004,1410) US 65535                                    #   2, 1 RecordInUseFlag
    (0004,1420) up 0                                        #   4, 1 OffsetOfReferencedLowerLevelDirectoryEntity
    (0004,1430) CS [IMAGE]                                  #   6, 1 DirectoryRecordType
    (0004,1500) CS [000001\CT1_UNC]                         #  14, 2 ReferencedFileID
    (0004,1510) UI =CTImageStorage                          #  26, 1 ReferencedSOPClassUIDInFile
    (0004,1511) UI [1.3.6.1.4.1.5962.1.1.1.1.1.20040826185059.5457] #  46, 1 ReferencedSOPInstanceUIDInFile
    (0004,1512) UI =LittleEndianExplicit                    #  20, 1 ReferencedTransferSyntaxUIDInFile
    (0008,0005) CS [ISO_IR 100]                             #  10, 1 SpecificCharacterSet
    (0020,0013) IS [1]                                      #   2, 1 InstanceNumber
  (fffe,e00d) na "ItemDelimitationItem"                   #   0, 0 ItemDelimitationItem
  (fffe,e000) na "Directory Record" PATIENT #=8           # u/l, 1 Item
  #  offset=$1154
    (0004,1400) up 1790                                     #   4, 1 OffsetOfTheNextDirectoryRecord
    (0004,1410) US 65535                                    #   2, 1 RecordInUseFlag
    (0004,1420) up 1278                                     #   4, 1 OffsetOfReferencedLowerLevelDirectoryEntity
    (0004,1430) CS [PATIENT]                                #   8, 1 DirectoryRecordType
    (0010,0010) PN [CompressedSamples^CT2]                  #  22, 1 PatientName
    (0010,0020) LO [2CT2]                                   #   4, 1 PatientID
    (0010,0030) DA (no value available)                     #   0, 0 PatientBirthDate
    (0010,0040) CS (no value available)                     #   0, 0 PatientSex
  (fffe,e00d) na "ItemDelimitationItem"                   #   0, 0 ItemDelimitationItem
  (fffe,e000) na "Directory Record" STUDY #=9             # u/l, 1 Item
  #  offset=$1278
    (0004,1400) up 0                                        #   4, 1 OffsetOfTheNextDirectoryRecord
    (0004,1410) US 65535                                    #   2, 1 RecordInUseFlag
    (0004,1420) up 1442                                     #   4, 1 OffsetOfReferencedLowerLevelDirectoryEntity
    (0004,1430) CS [STUDY]                                  #   6, 1 DirectoryRecordType
    (0008,0020) DA [20040826]                               #   8, 1 StudyDate
    (0008,0030) TM [185059]                                 #   6, 1 StudyTime
    (0008,0050) SH (no value available)                     #   0, 0 AccessionNumber
    (0020,000d) UI [1.3.6.1.4.1.5962.1.2.2.20040826185059.5457] #  42, 1 StudyInstanceUID
    (0020,0010) SH [2CT2]                                   #   4, 1 StudyID
  (fffe,e00d) na "ItemDelimitationItem"                   #   0, 0 ItemDelimitationItem
  (fffe,e000) na "Directory Record" SERIES #=7            # u/l, 1 Item
  #  offset=$1442
    (0004,1400) up 0                                        #   4, 1 OffsetOfTheNextDirectoryRecord
    (0004,1410) US 65535                                    #   2, 1 RecordInUseFlag
    (0004,1420) up 1578                                     #   4, 1 OffsetOfReferencedLowerLevelDirectoryEntity
    (0004,1430) CS [SERIES]                                 #   6, 1 DirectoryRecordType
    (0008,0060) CS [CT]                                     #   2, 1 Modality
    (0020,000e) UI [1.3.6.1.4.1.5962.1.3.2.1.20040826185059.5457] #  44, 1 SeriesInstanceUID
    (0020,0011) IS [1]                                      #   2, 1 SeriesNumber
  (fffe,e00d) na "ItemDelimitationItem"                   #   0, 0 ItemDelimitationItem
  (fffe,e000) na "Directory Record" IMAGE #=9             # u/l, 1 Item
  #  offset=$1578  refFileID="000001\CT2_UNC"
    (0004,1400) up 0                                        #   4, 1 OffsetOfTheNextDirectoryRecord
    (0004,1410) US 65535                                    #   2, 1 RecordInUseFlag
    (0004,1420) up 0                                        #   4, 1 OffsetOfReferencedLowerLevelDirectoryEntity
    (0004,1430) CS [IMAGE]                                  #   6, 1 DirectoryRecordType
    (0004,1500) CS [000001\CT2_UNC]                         #  14, 2 ReferencedFileID
    (0004,1510) UI =CTImageStorage                          #  26, 1 ReferencedSOPClassUIDInFile
    (0004,1511) UI [1.3.6.1.4.1.5962.1.1.2.1.1.20040826185059.5457] #  46, 1 ReferencedSOPInstanceUIDInFile
    (0004,1512) UI =LittleEndianExplicit                    #  20, 1 ReferencedTransferSyntaxUIDInFile
    (0020,0013) IS [1]                                      #   2, 1 InstanceNumber
  (fffe,e00d) na "ItemDelimitationItem"                   #   0, 0 ItemDelimitationItem
  (fffe,e000) na "Directory Record" PATIENT #=8           # u/l, 1 Item
  #  offset=$1790
    (0004,1400) up 2492                                     #   4, 1 OffsetOfTheNextDirectoryRecord
    (0004,1410) US 65535                                    #   2, 1 RecordInUseFlag
    (0004,1420) up 1916                                     #   4, 1 OffsetOfReferencedLowerLevelDirectoryEntity
    (0004,1430) CS [PATIENT]                                #   8, 1 DirectoryRecordType
    (0010,0010) PN [CompressedSamples^MG1]                  #  22, 1 PatientName
    (0010,0020) LO [3MG1]                                   #   4, 1 PatientID
    (0010,0030) DA (no value available)                     #   0, 0 PatientBirthDate
    (0010,0040) CS [F]                                      #   2, 1 PatientSex
  (fffe,e00d) na "ItemDelimitationItem"                   #   0, 0 ItemDelimitationItem
Conclusion
That concludes this short tutorial on both reading and creating DICOM directory files. DICOMDIR is a useful feature, and it provides information in a compact form about all the files contained on any DICOM storage media. This helps a processing application or user to select or browse through relevant images without having to parse through every single file on the media by having to query their individual attributes. This is can be a time saver especially when you are dealing with large sets of DICOM files which is often the case in a clinical setting. However, please be cautious on the use of DICOMDIR files because some files in the various folders maybe have been added after the DICOM directory file was originally created, and so, things can go out of sync easily. Lot of multimedia applications these days scan entire directories in the order of only milliseconds to determine content within them, and hence, going that route may not be a bad idea as well. I will leave that to you to decide.
If you have any questions or comments regarding this tutorial, please feel free to send me an email. Please note that I may not get back to you right away due to work and other commitments. In my next tutorial in this series, we will move on to another interesting area of the standard namely DICOM Communications/Networking. I will start by showing how to check for DICOM connectivity using C-Echo or “DICOM ping” as it is sometimes called. See you then.